Creating a policy in the ACP policy editor
Instructions on how to create a policy to verify requests based on your access control requirements using the Authorization Control Plane policy editor.
About policies
For detailed information about the policy concept in ACP, read Cloudentity ACP authorization policies.
ACP policy editor allows you to create a logical structure composed of
validators (provided
out of the box by ACP) where each validator returns
true or false based on the checks it performs. As a result, ACP can
evaluate whether to pass on or block the request.
Note
Policy decision is made outside of the policy editor, where you only define the logic. For more information, read Cloudentity ACP authorization policies.
Validators can perform the following actions:
-
Check attributes from the request context (including authentication context, ID and access tokens, secrets, and scopes)
-
Check request header parameters
-
Check dynamic scopes
-
Embed existing policies into the current policy
-
Add if/else logic to the policy
-
Provide MFA checks with OTP recovery
-
Match values based on wildcards, i.e.
admin-*matchingadmin-123
In a lot of cases, a single validator is enough for the policy. All validators must return true
for the policy to return true (i.e. pass),
unless you add a custom if/else logic.
If a policy doesn’t pass, the request where the policy is assigned is blocked. Cloudentity policies are grouped into the following types:
| Policy type | Description |
|---|---|
| User | User policies validate requests involving user interaction (for example to determine whether or not a client can ask the user for access to certain data). They can be assigned on a workspace level (Token issue policy), application level (User policy) and service scope level (Consent grant policy). |
| Developer | Developer policies validate client registration, including the scopes the client may ask for. They can be assigned on a workspace level (Client registration policy) and service scope level (Client assignment policy). |
| Machine to machine | These policies validate a token request coming from a client using the Client credentials OAuth 2.0 flow. They can be assigned on a workspace level (Machine token policy) and service scope level (Machine to Machine policy). |
| Dynamic Client Registration | DCR policies are used to validate Dynamic Client Registration requests. |
| API Request | An API policy validates requests coming to APIs protected by a gateway bound to ACP. |
Create a policy
Check the video and the procedure below to learn how to create a policy in ACP. Policies are created per workspace and the workspace name is automatically added as a prefix to the policy ID.
-
Select Policies -> Create policy.
-
Fill in the policy form. Make sure to select the correct policy type as explained in the table above.
-
Select Create. The policy editor opens.
-
Define the policy using dedicated validators. Note that you can only add validators relevant to the selected policy type. Check the validator list below for more information.
Wildcards pattern matching
Warning
This feature works in the Cloudentity policy editor only - it’s not available for Rego policies.
When creating policies, you can match values to a pattern using the * character. Consider the
policy comparator below:
{
  "fields":[
    {
      "field":"sub",
      "comparator":"equals",
      "value":"admin-*"
    }
  ]
}
Such comparator matches all values with the admin- prefix, such as admin-123.
In the editor UI, the above implementation would look as follows:
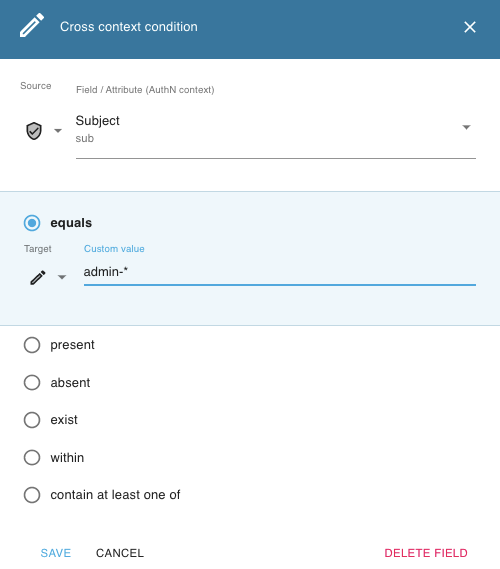
If you want the * character to be interpreted literally, escape it with \ as shown below:
{
  "fields":[
    {
      "field":"group",
      "comparator":"equals",
      "value":"\*"
    }
  ]
}
Such comparator matches * only.
Attributes validator
Attribute validator is a generic validator allowing you to compare any source valid for the selected policy type
-
Authentication context attribute
-
Access token claims
-
ID token claims
-
Secrets
-
Scopes
against any target valid for the selected policy type. Note that it might be easier to add and set up dedicated validators, where you have fewer source/target options.
In the video below, we are creating a policy checking if the request comes from a client application registered within a specific tenant.
Authentication context validator
Authentication context validator allows you to check an authentication context attribute against
-
a specific value
-
another authentication context attribute
In the video below, we are creating a policy checking that the IDP used to authenticate is
registered in ACP under the name github.
Client validator
Client validator can validate the client context attributes in the request, passed in the contexts.client
object. This way, you can verify any client registered in ACP. For a list of
client parameters, see the Client API documentation.
In the video below, we are creating
a policy checking a specific client attribute (attribute_name). We expect this attribute to have a
specific value.
This policy passes when the following client data is present in the request:
  "contexts": {
        "client": {"attribute_name": "value"}
  }
Developer validator
Developer validator can validate the developer context attributes in the request, passed in the contexts.developer
object.
In the video below, we are creating
a policy checking a specific developer attribute (attribute_name). We expect this attribute to
have a specific value.
This policy passes when the following developer data is present in the request:
  "contexts": {
        "developer": {"attribute_name": "value"}
  }
Embedded policy validator
Embedded policy validator allows you to pick another policy of the same type and resolve it within this validator. This way, you can nest policies within other policies.
Embedded REGO policies for Istio header injection
To learn more, see Header injection for Istio policies.
Authentication factors (MFA) validator
Authentication factors validator checks if the user has completed the MFA process and prompts the user to do so if they didn’t.
ID token validator
ID token validator compares an ID token attribute to a specific value or another ID token attribute.
Request header validator
Request header validator allows you to check a specific header for value or presence. In the video below, we are creating a policy checking for a specific header value.
Logical validators
By default, the policy checks all of its validators and passes only if all of them are resolved as
true. It is however possible to create a conditional policy which allows you to build if/else
statements based on validators, as shown in the video example below.
The Fail and Pass validators end policy resolution.
Signal validator
The Signal validator is useful when your requests are protected via Signal Sciences, allowing you to check the Signal warnings in order to validate the policy. You can check for the presense or absence of warnings.
Software statement validator
When client registration in ACP is protected by a software statement assertion (SSA), you can use this validator to further restrict client registration based on certain parameters in the SSA, as shown in the video below.
This policy passes when the following client data is present in the request:
  "contexts": {
        "softwareStatement": {"attribute_name": "value"}
  }
Test your policy
You can test your policy in Test mode against a sample input which is intended to mimic a real request. Edit the input so that it matches the request you expect this policy to receive and run the policy to see if you get the expected outcome.
In the video below, we are verifying the name attribute from the authentication context against a
specific value.
Related articles
Having defined a policy, it’s time to assign it to an execution point and use it. Check the following resources for help: