Protecting APIs with the Standalone Authorizer
ACP Standalone Authorizer gives you a possiblity to connect your internal API gateway to a locally deployed ACP authorizer for externalized access control. Learn how to implement authorization for your APIs.
About Standalone Authorizer
Standalone Authorizer provides an external authorization service for API gateways and applications. It is an unique authorizer, because it is not specialized to any single product or technology, and is capable of serving in a variety of use-cases. This is why you can use Standalone Authorizer to protect your APIs that are deployed behind your own internal gateway. This flexible option for external authorization, allows policy management for API access to be managed centrally, with benefits to visibility and auditability.
To learn more about the authorizer, see the Configurable External Authorization for APIs documentation.
Prerequisites
-
Docker version required is 1.20 or subsequent
-
Docker-compose version required is 1.29 or subsequent
-
Access to an ACP tenant
Create Standalone Authorizer
-
In the workspace of your choice, go to APIs > Gateways.
-
Select ADD GATEWAY.
-
Select Standalone and provide a display name and a description for your authorizer.
-
Optionally, enable the Create and bind services automatically check box.
Tip
When enabled, all services protected by your Standalone Authorizer instance are discovered and added to the ACP service list automatically when the Standalone Authorizer is connected to ACP. Otherwise, you need to add them manually.
-
On the Gateway Management Quick Start tab, click Download Package.
The
standalone-authorizer.zipfile contains three files:-
.envthat contain OAuth client credentials for your authorizerClient credentials
In ACP a gateway/authorizer objects consists of two objects: an actual gateway and a client application created for this gateway/authorizer in the System workspace for your tenant. Credentials of this client application are used in client credentials OAuth grant flow call to the ACP’s token endpoint to authenticate your client application.
-
credentials.txtDocker-login credentials -
docker-compose.ymlresponsible for providing your authorizer’s deployment configuration.TLS certificates
If your ACP service is using a self-signed certificate, or the certificate does not match the hostname that you are using to connect to ACP, you can disable the TLS check by adding the
ACP_TLS_CLIENT.INSECURE_SKIP_VERIFYenvironment variable set totrueto yourdocker-compose.ymlfile. See example:environment: - ACP_TLS_CLIENT.INSECURE_SKIP_VERIFY=true
-
-
In your terminal, navigate to the directory where you have unzipped the Standalone Authorizer.
-
Use the following commands to start the authorizer in a Docker container:
cat credentials.txt | docker login docker.cloudentity.io --username acp --password-stdin
docker-compose up
After you run the docker-compose up, you should see output similar to the following:
standalone-authorizer    | {"commit":"a1463ff","level":"info","msg":"starting standalone authorizer","time":"2021-10-25T12:10:37Z","version":"latest"}
standalone-authorizer    | {"level":"info","msg":"standalone-authorizer listening on https://localhost:9004","time":"2021-10-25T12:10:38Z"}
standalone-authorizer    | {"level":"info","msg":"Starting authorizer reload...","time":"2021-10-25T12:10:48Z"}
standalone-authorizer    | {"level":"info","msg":"Authorization configuration reloaded (170.685855ms)","time":"2021-10-25T12:10:48Z"}
It means that your Standalone Authorizer instance is successfully running and that it started to load authorization configuration. The authorizer is ready to discover APIs.
Configuring the Standalone Authorizer
The Standalone Authorizer can be configured with a file in YAML format, or via environment variables. To generate a template configuration file that is populated with default settings, you can use a Docker image and pipe the output to a configuration file:
docker run --rm docker.cloudentity.io/standalone-authorizer reference > reference_config.yaml
The configuration file reference_config.yaml contains the following content:
acp_client_id: ""
acp_client_secret: ""
acp_issuer_url: ""
acp_reload_interval: 10s
acp_tls_client:
    timeout: 0s # http client timeout
    retry_wait_min: 0s # minimum time to wait between retries
    retry_wait_max: 0s # maximum time to wait between retries
    retry_max: 0 # maximum number of retries
    root_ca: "" # root ca that this client should trust (defaults to system root ca)
    insecure_skip_verify: false # disable cert verification
    disable_follow_redirects: false # disable follow redirects
    disable_retry: false # disable retry
analytics:
    probability: 1
    batchinterval: 1s
    batchlimit: 100
    limit: 5
    timeout: 5s
    workers: 8
disable_analytics: false
server:
    certificate:
        password: "" # key passphrase
        cert_path: "" # path to the certificate PEM file
        key_path: "" # path to the key PEM file
        cert: "" # base64 encoded cert PEM
        key: "" # base64 encoded key PEM
        generated_key_type: ecdsa # type for generated key if cert and key are not provided (rsa or ecda)
    client_auth_type: 0
    dangerous_disable_tls: false
    listener_port: 9004
You can use this reference configuration as a basis for your customization. You can omit settings for which the default configuration is satisfactory, specifying only the required values, which are the client ID, client secret, and issuer URL parameters.
acp_client_id: {your_client_id}
acp_client_secret: {your_client_secret}
acp_issuer_url: https://{tid}.us.authz.stage.cloudentity.io/{tid}/system
Environment variables can also be used to set these configuration values. The environment variable’s name
are the uppercase version of the YAML name. For example, in the docker-compose.yml that you downloaded,
you can set the acp_client_id via the environment variable ACP_CLIENT_ID:
    environment:
      - ACP_CLIENT_ID=${CLIENT_ID}
      - ACP_CLIENT_SECRET=${CLIENT_SECRET}
      - ACP_ISSUER_URL=${ISSUER_URL}
      - SERVER.LISTENER_PORT=9004
Tip
Note that nested YAML settings can be accessed by joining uppercased names with periods, as shown in the example above, where the
SERVER.LISTENER_PORT=9004parameter is set.
To run the standalone authorizer with a configuration file, use the --config option to specify
the YAML file with your configuration.
For example, assuming that you have created a standalone_config.yaml file in your current
directory your docker run command would look like the following:
docker run --rm --volume `pwd`:/config:ro docker.cloudentity.io/standalone-authorizer --config /config/standalone_config.yaml
Create API Groups
To enable the Standalone Authorizer to discover your APIs, you need to prepare your API definition in a form of a JSON file.
The JSON specification is defined as follows:
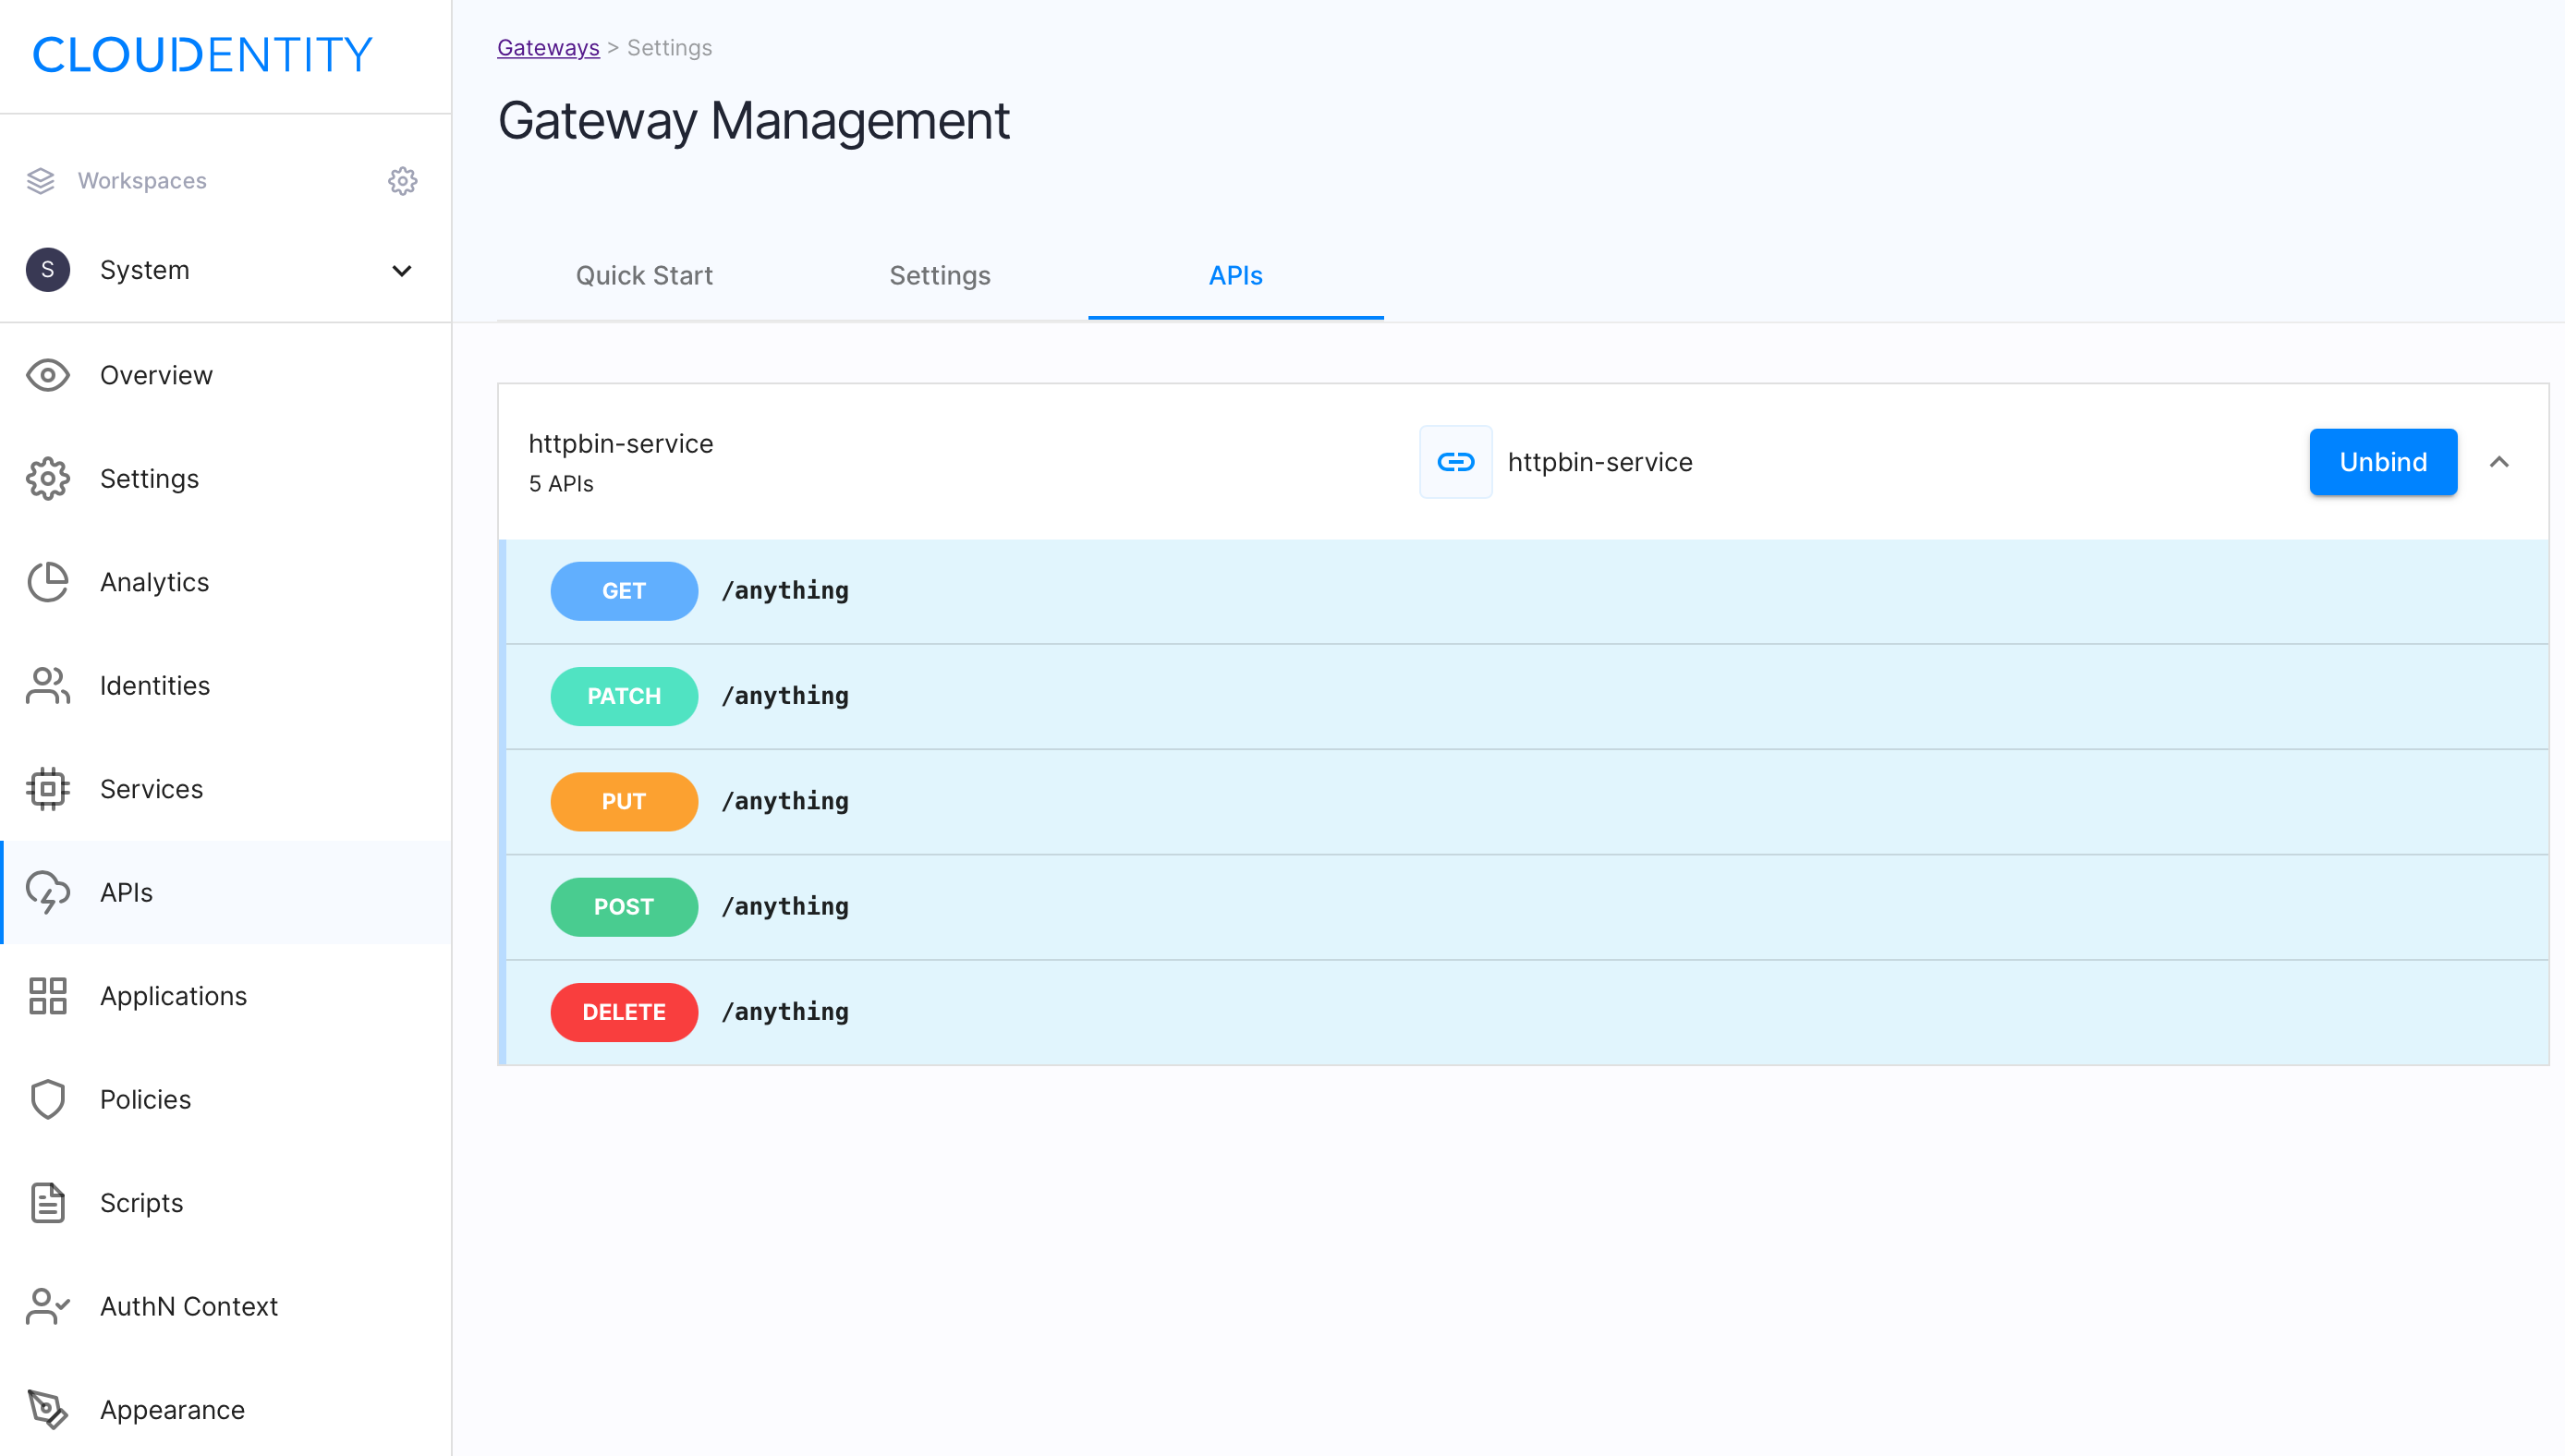
Below, you can see an example which defines one endpoint at the /anything path that supports five
HTTP methods:
Import APIs to authorizer
Once you have configured the Standalone Authorizer container and prepared a specification for your APIs, you need to import them to your Standalone Authorizer’s instance. When the APIs are imported, you are able to apply access control to them by assigning authorization policies.
Send a PUT request to the /apis endpoint of your Standalone Authorizer. See example below:
curl -sSLk -D - -X PUT https://localhost:9004/apis \
--header "content-type:application/json" \
--data @{YOUR_JSON_WITH_API_GROUPS_SPECIFICATION}
Remember to change the {YOUR_JSON_WITH_API_GROUPS_SPECIFICATION} variable to the name of the
file where you have provided your API specification.
Result
On success, the Standalone Authorizer responds with
HTTP/1.1 204 No Content. You can also observe the results of this operation in the ACP’s Gateway Management page, by selecting the APIs tab and clicking on your service name.
You can also confirm your API configuration by querying the Standalone Authorizer’s /apis endpoint:
curl -sSLk -X GET https://localhost:9004/apis \
--header "Accept:application/json"
As the result of this request, you get a list of all APIs imported to your Standalone Authorizer instance.
Apply authorization policies
The Standalone Authorizer makes it possible to validate your authorization policies assigned to your
imported APIs by making a POST request to the /request/validate endpoint of the Standalone
Authorizer.
If you were to make such a request now, you would see that your APIs do not have any authorization policy assigned at the moment. See example below.
curl -sSLk -D - -X POST https://localhost:9004/request/validate \
--header "content-type:application/json" \
--data   '{"api_group":"my-service","method":"GET","path":"/anything"}'
HTTP/1.1 200 OK
Content-Type: application/json; charset=utf-8
Date: Wed, 27 Oct 2021 08:45:42 GMT
Content-Length: 0
As you can see, the GET request results with the HTTP/1.1 200 OK status. It means that there is
no access control applied for this API at the moment.
Let’s protect your APIs.
-
In the workspace where you have your APIs discovered, navigate to APIs view.
-
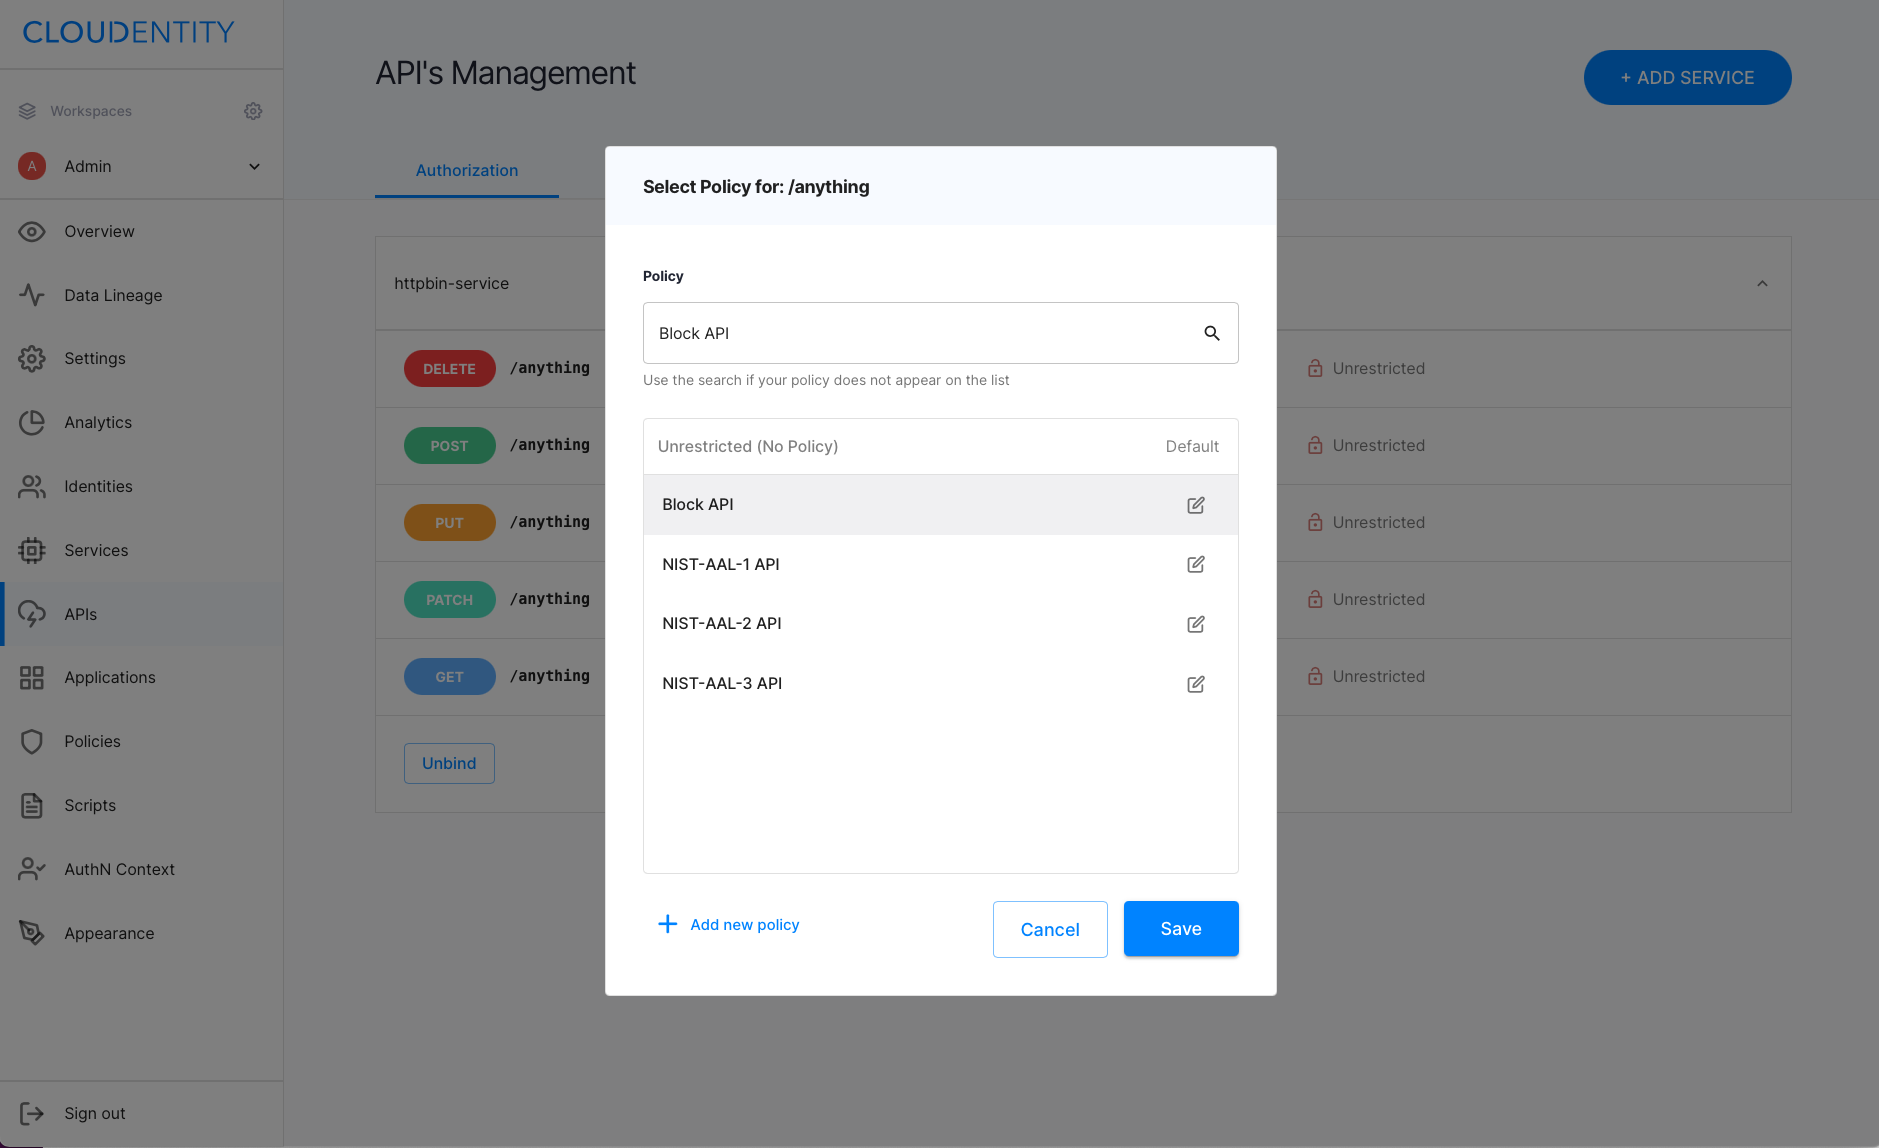
Apply an authorization policy to one of your APIs.
-
For the API you wish to set a policy, select the Unrestricted / Protected button.
-
Choose a policy from the list or add a new one.
You can, for example, set the Block API policy for testing purposes.
-
Select Save.
-
-
Make a
POSTrequest to the/request/validateendpoint for your Standalone Authorizer. See example below.curl -sSLk -D - -X POST https://localhost:9004/request/validate \ --header "content-type:application/json" \ --data '{"api_group":"my-service","method":"GET","path":"/anything"}'Learn more
Learn more about the
/request/validateendpoint’s schema by reading the its schema section.Set the
api_groupparameter to the name of the service you have imported to ACP. Provide the samemethodandpathparameter to which you have applied your authorization policy.Result
If you applied the Block API policy to the
GETmethod for the/anythingendpoint, the request now returns theHTTP/1.1 403 Access Forbiddenstatus with the following response body:{"status_code":403,"error":"request in not authorized","details":null}
Tip
To test your API access control, you can also use the
NIST-AAL-1authorization policy. The policy enforces access protection with an additional requirement: the HTTP request must contain an access token. To test how it works, apply the policy to the endpoint of your choice and make the request with theauthorizationheader as in the example below:curl -sSLk -D - -X POST https://localhost:9004/request/validate \ --header "content-type:application/json" \ --data '{"api_group":"new-service","method":"DELETE","path":"/anything","headers":{"authorization":["Bearer '$AT'"]}'The
$ATenvironment variable stands for your access token. To learn more on how to authenticate your client applications, read the Getting started with ACP REST API documentation.
/request/validate schema
To validate an HTTP request to a defined Gateway API, POST the request to the Standalone
Authorizer’s /request/validate endpoint:
curl -sSLk -D - -X POST https://localhost:9004/request/validate \
     --header "content-type:application/json" \
     --data   @request_body.json
The JSON requst body represents the HTTP request that you wish to authorize:
Apply specific authorization policy
The Standalone Authorizer makes it possible to validate access to your imported APIs against a
specific policy,
by making a POST request to the /policy/validate endpoint of the Standalone Authorizer.
The policy does not need to be assigned to the API, because it is specified in the authorization
request to the /policy/validate
endpoint of the Standalone Authorizer. Your POST request to /policy/validate must specify the
policy ID that you wish to apply,
via the policy key of the JSON request. In this example, we specify the authorization policy
named NIST-AAL-1 API:
 curl -sSLk -D - -X POST https://localhost:9004/policy/validate \
     --header "content-type:application/json" \
        --data   '{"policy":"nist-aal-1_system_api","method":"GET","path":"/anything"}'
The example above results in HTTP status 403, because the policy NIST-AAL-1 requires the
requesting client to present an access token. In the example below, the client’s request
specifies the token that is be tested by the policy:
 curl -sSLk -D - -X POST https://localhost:9004/policy/validate \
     --header "content-type:application/json" \
        --data   '{"token":"'$AT'","policy":"nist-aal-1_system_api","method":"GET","path":"/anything"}'
The $AT environment variable stands for your access token. To learn more on how to authenticate
your client applications, read the Getting started with ACP REST API
documentation.
/policy/validate schema
To validate an HTTP request to a defined Gateway API using a specified authorization policy,
POST the request to the Standalone Authorizer’s /policy/validate endpoint:
curl -sSLk -D - -X POST https://localhost:9004/policy/validate \
     --header "content-type:application/json" \
     --data   @request_body.json
The JSON request body represents the HTTP request that you wish to authorize:
Note that policies must be specified by the policy ID, rather than the policy name.
Some policies require an access token to be specified in the token field.