Getting started with ACP REST API
Learn how to start working with Authorization Control Plane (ACP) API and how to use it for different configuration purposes.
In this guide
- You’ll find out why ACP API can make your life easier, what are its distinctive capabilities, and how it can address ACP use cases that are of the developer’s interest.
- You’ll configure your ACP so that you can start making API calls.
- You will learn how to acquire an access token, which is required to make API calls to ACP endpoints.
- You’ll have a chance to create a new authorization server.
- You’ll connect a static identity provider (IDP) to your new authZ server.
- You’ll find out how to modify the configuration of your new IDP.
ACP API in a nutshell
ACP API allows you to set up, configure, and use ACP for a wide range of authorization purposes. With ACP API, you can leverage ACP features to their full potential by addressing technically-advanced use cases and customization scenarios. You can save time and make your work more efficient by using ACP API to automate specific operations.
With ACP API, you can, for example,
- Automate particular actions by using a script that executes API calls in a sequence
- Execute bulk actions, such as the configuration of multiple policies without working on them one-by-one
- Safely update interdependent policies with no risk of a misconfiguration error
- Implement advanced customization and contextual changes to default configurations
ACP API documentation
Check the ACP API reference for all APIs grouped into categories (Admin, Developer, System, OAuth). For each category, find the API list provided with usage descriptions, sample requests and responses, path parameters, and request body schemas. In the Authentication section, there are all authentication measures required for working with Admin, Developer, OAuth2, and System APIs.
Prerequisites
- You have an ACP account.
- You have administrator’s privileges for your account and you’re logged in.
Acquire an access token
ACP uses OAuth 2.0 access tokens to authenticate client applications. The authenticated client applications are allowed to access ACP APIs.
To get an access token, you need to set up
your administrator’s workspace and, next, make a call to the
token endpoint. The token endpoint returns an access token that you
can use as a value of the Authorization header in your API calls (Create an authorization
server, Connect an IDP, Update IDP
configuration).
Preconfigure your workspace
To be able to get an admin access token in ACP, you have to set up your Admin workspace (included by default within your tenant) so that it allows specific flows and actions: You need to allow the client-credentials grant both for your Admin workspace and for an application within that workspace. With the client-credentials grant enabled, you’ll be able to get a client ID and a client secret, which are required as parameters in a request to the token endpoint.
To configure your Admin workspace, start with logging in to ACP as an administrator. For instructions on how to proceed from that point, either see the video or follow steps 1-5.
Video instruction
Step-by-step
-
From Workspace Directory, enter any workspace available and, next, select your Admin workspace from the Workspaces dropdown in the sidebar.
-
For the Admin workspace, enable Client credentials as an allowed grant type by selecting Settings > Authorization > Allowed grant types > Client credentials. Select Save changes at the bottom of the page.
-
In the same workspace, create an application. You can pick the Server Web Application type or the Service Application type to skip the configuration of Token Endpoint Authentication Method in the next step.
-
Go to the OAuth view of your application and
-
Add client_credentials to Grant Types.
-
If you selected an application type other than Server Web Application or Service Application, set Token Endpoint Authentication Method to Client Secret Post.
Result
The Overview page of your new application provides you with metadata required to call the token endpoint in the next step:
- Token endpoint
- Client ID
- Client secret
-
-
Optionally, if you’d like your application to request any additional data or perform any specific actions on top of what’s required for purposes of this guide, go to the Scopes view of your application and enable relevant scopes.
Read more
Scopes define what an application is able to do on behalf of the user or the resource owner. If a client application requests resources from the resource server and authenticates itself with ACP, it may request a specific scope to indicate the access it needs. When ACP responds to such a request, it provides access to resources only within the scope provided in the request to the token endpoint.
Check the ACP documentation for more scope-related information: dynamic scopes, scope configuration, and more.
Note
-
If you want to work with system APIs, you need to create a client application in the System workspace. Check the scopes your client application needs to work with system APIs in the Authentication API documentation.
-
Authentication methods, token URLs, and scopes for specific workspaces are listed in the Authentication API documentation.
-
Call the token endpoint
With the application client ID and secret, you can proceed to requesting a token, which is for authenticating API calls for your tenant.
-
Identify information that you need to make the token call.
-
Token endpoint
- Copy the token endpoint available in the Overview page of your new application or
- Use the token endpoint path provided in the OAuth 2.0 token endpoint API
documentation,
for which you need
tidandaiddetailed as path parameters in this article.
-
Path parameters
aidstands for authorization server identifier and represents the workspace name.tidstands for tenant identifier. Tenant is your ACP hosting entity granted you by default for your ACP account (check Tenant model for more information). Your tenant ID is a string that you can find in your ACP URL when you’re signed in: It’s visible as the initial part of the domain right before.authz.cloudentity.io(https://your-tenant-id.authz.cloudentity.io/).
-
Headers
accept: application/x-www-form-urlencoded(for enabling the proper format in the request body)
-
Request body parameters
grant_type=client_credentialsclient_idof your new application (check the Overview page of your new application)client_secretof your new application (check the Overview page of your new application)
-
-
In your terminal, enter the request with the parameters and the header properly configured. Execute it.
curl -X POST https://{tid}.authz.cloudentity.io/{tid}/{aid}/oauth2/token \
--header "Content-Type: application/x-www-form-urlencoded" \
--data-raw "grant_type=client_credentials&client_id={use-your-new-client-id-here}&client_secret={use-your-new-client-secret-here}"
Sample expected output
{
   "access_token": "eyJhbGciOiJFUzI1NiIsImtpZCI6Ijg0MzEwMzc3OTQwMTM3MTkxMzU4MDI2ODIyODA3MzQzODMwMDE4IiwidHlwIjoiSldUIn0.eyJhaWQiOiJhZG1pbiIsImFtciI6W10sImF1ZCI6WyJjM3JkODRyOTA3MmZnOXVnOGRsMCIsInNwaWZmZTovY2xvdWRlbnRpdHktZHdvamNpay9hZG1pbi9jMzBiYXFoam1sbDhxN3A2cHBpZyJdLCJleHAiOjE2MjY4NTg5NTgsImlhdCI6MTYyNjg1NTM1OCwiaWRwIjoiIiwiaXNzIjoiaHR0cHM6Ly9jbG91ZGVudGl0eS1kd29qY2lrLmF1dGh6LmNsb3VkZW50aXR5LmlvL2Nsb3VkZW50aXR5LWR3b2pjaWsvYWRtaW4iLCJqdGkiOiJkMjYzZjM0NC1hNzA1LTQzZDYtYmJmZi1jZjU3MzA5OTc5YzUiLCJuYmYiOjE2MjY4NTUzNTgsInNjcCI6WyJpbnRyb3NwZWN0X3Rva2VucyIsInJldm9rZV90b2tlbnMiXSwic3QiOiJwdWJsaWMiLCJzdWIiOiJjM3JkODRyOTA3MmZnOXVnOGRsMCIsInRpZCI6ImNsb3VkZW50aXR5LWR3b2pjaWsifQ.QjVSwpmDgl3tPMIinx6b3pCn4pRJAT1vStrX4bAY8mcoZcAMX7XyGr8R6SzsATwG21bBroLeSvwuGw9E_8_eGA",
   "expires_in": 1234,
   "scope": "introspect_tokens revoke_tokens",
   "token_type": "bearer"
}
Read more
For more details, see the OAuth 2.0 token endpoint API documentation.
Result
You have a token that you can use for authentication while making API calls within your tenant.
Remember
An access token has the time-to-live (TTL) parameter, which defines for how long you can use your token. When this time passes, the token expires. Trying to authenticate the client with an expired token results in an error of invalid authentication. If your token expires, you need to acquire a new access token by calling the token endpoint again.
Create an authorization server
With your token in place, you can proceed to creating a new authorization server (workspace) (to be available in your ACP portal as another workspace).
-
Navigate to the createAuthorizationServer API reference for details on what is required to make a call for adding another workspace within your tenant.
- Create-authorization-server endpoint
- Path parameter
tid - Header
Authorization: Bearer {bearer-token-string}(retrieved in Acquire an access token) - Header
Content-Type: application/json(for enabling the proper format in the request body) - Query parameter
with_demo_client(for enabling the demo application for the new workspace) - Request body parameters
-
In your terminal, enter the request with the parameters and the headers properly configured. Execute it.
curl --request POST 'https://{tid}.authz.cloudentity.io/api/admin/{tid}/servers' \
--header 'Authorization: Bearer {enter-bearer-token-here}' \
--header 'Content-Type: application/json' \
--data-raw '{
    "tenant_id": "enter-your-tid-here",
    "id": "enter-id-here",
    "profile": "enter-workspace-profile-here",
    "name": "enter-workspace-name-for-UI-here",
    "type": "regular",
    "color": "#EC5348",
    "secret": "enter-secret-as-string-of-characters",
    "rotated_secrets": [],
    "access_token_strategy": "jwt",
    "key_type": "ecdsa",
    "logo_uri": "",
    "issuer_url": "",
    "dynamic_client_registration": {
        "enabled": false,
        "initial_access_token": {
            "required": false
        },
        "payload": {
            "format": "json",
            "jws_payload": {
                "jwks": {
                    "keys": null
                },
                "jwks_uri": ""
            }
        }
    },
    "grant_types": [
        "client_credentials",
        "authorization_code"
    ],
    "token_endpoint_authn_methods": [
        "none",
        "client_secret_basic",
        "client_secret_post",
        "client_secret_jwt",
        "private_key_jwt",
        "tls_client_auth",
        "self_signed_tls_client_auth"
    ],
    "access_token_ttl": "1h0m0s",
    "refresh_token_ttl": "720h0m0s",
    "authorization_code_ttl": "10m0s",
    "id_token_ttl": "1h0m0s",
    "cookie_max_age": "1h0m0s",
    "jwks": {
        "keys": [ ]
    },
    "enforce_pkce": false,
    "enforce_pkce_for_public_clients": false,
    "root_cas": "",
    "read_client_certificate_from_header": true,
    "client_certificate_header": "X-SSL-CERT",
    "subject_identifier_types": [
        "public",
        "pairwise"
    ],
    "subject_identifier_algorithm_salt": "enter-identifier-as-string-of-characters",
    "enable_trust_anchor": false,
    "trust_anchor_configuration": {
        "jwks": {
            "keys": null
        },
        "jwks_uri": ""
    },
    "enable_quick_access": false,
    "enable_idp_discovery": false,
    "enable_legacy_clients_with_no_software_statement": false,
    "dynamic_scope_separator": ".",
    "backchannel_token_delivery_modes_supported": null,
    "backchannel_user_code_parameter_supported": false
}'
Expected response body
You are returned with JSON including multiple parameters of the newly-created workspace.
Result
Your new authorization server is visible in ACP as another workspace within your tenant. Now, if you call the list-authorization-servers endpoint, you can see your new workspace and its definition in the response.
Read more
For more details, see the createAuthorizationServer API documentation.
Connect an IDP
With your new authorization server up and running, you can proceed to connecting a static identity provider (IDP) to the server.
The static (sandbox) IDP is a specific type of identity connection that allows you to configure mock users and their authentication context data for testing purposes. Check how to add the static IDP for your workspace in Connecting Sandbox IDP.
-
Navigate to the createStaticIDP API reference for details on what is required to make a call for adding another IDP within your new workspace.
- Create-static-IDP endpoint (
https://{tid}.authz.cloudentity.io/api/admin/{tid}/servers/{aid}/idps/static) - Path parameter: your
tid(unchanged) and theaidfor the new authorization server (idreturned from the create-authz-server call) - Header
Authorization: Bearer {bearer-token-string}(retrieved in Acquire an access token) - Header
Content-Type: application/json(for enabling the proper format in the request body) - Request body parameters
- Create-static-IDP endpoint (
-
In your terminal, enter the request with the parameters and the headers properly configured. Execute it.
curl --request POST 'https://{tid}.authz.cloudentity.io/api/admin/{tid}/servers/{aid}/idps/static' \
--header 'Content-Type: application/json' \
--header 'Authorization: Bearer {enter-bearer-token-here}' \
--data-raw '{
    "id": "enter-id-for-your-new-IDP-here",
    "tenant_id": "enter-your-tid-here",
    "authorization_server_id": "enter-your-aid-here",
    "client_id": null,
    "name": "enter-IDP-name-for-UI-here",
    "disabled": false,
    "method": "static",
    "attributes": null,
    "mappings": [
        {
            "source": ".",
            "target": ".",
            "type": "any",
            "allow_weak_decoding": false
        }
    ],
    "static_amr": [],
    "transformer": {
        "enabled": false,
        "script": ""
    },
    "config": {
        "enable_stateful_ctx": false,
        "stateful_ctx_duration": "0s"
    },
    "domains": [],
    "settings": {
        "hint": false
    },
    "credentials": {
        "users": [
            {
                "username": "enter-username-for-end-user-login",
                "password": "enter-password-for-end-user-login",
                "authentication_context": {
                    "name": "user1"
                }
            }
        ]
    }
}'
Sample response
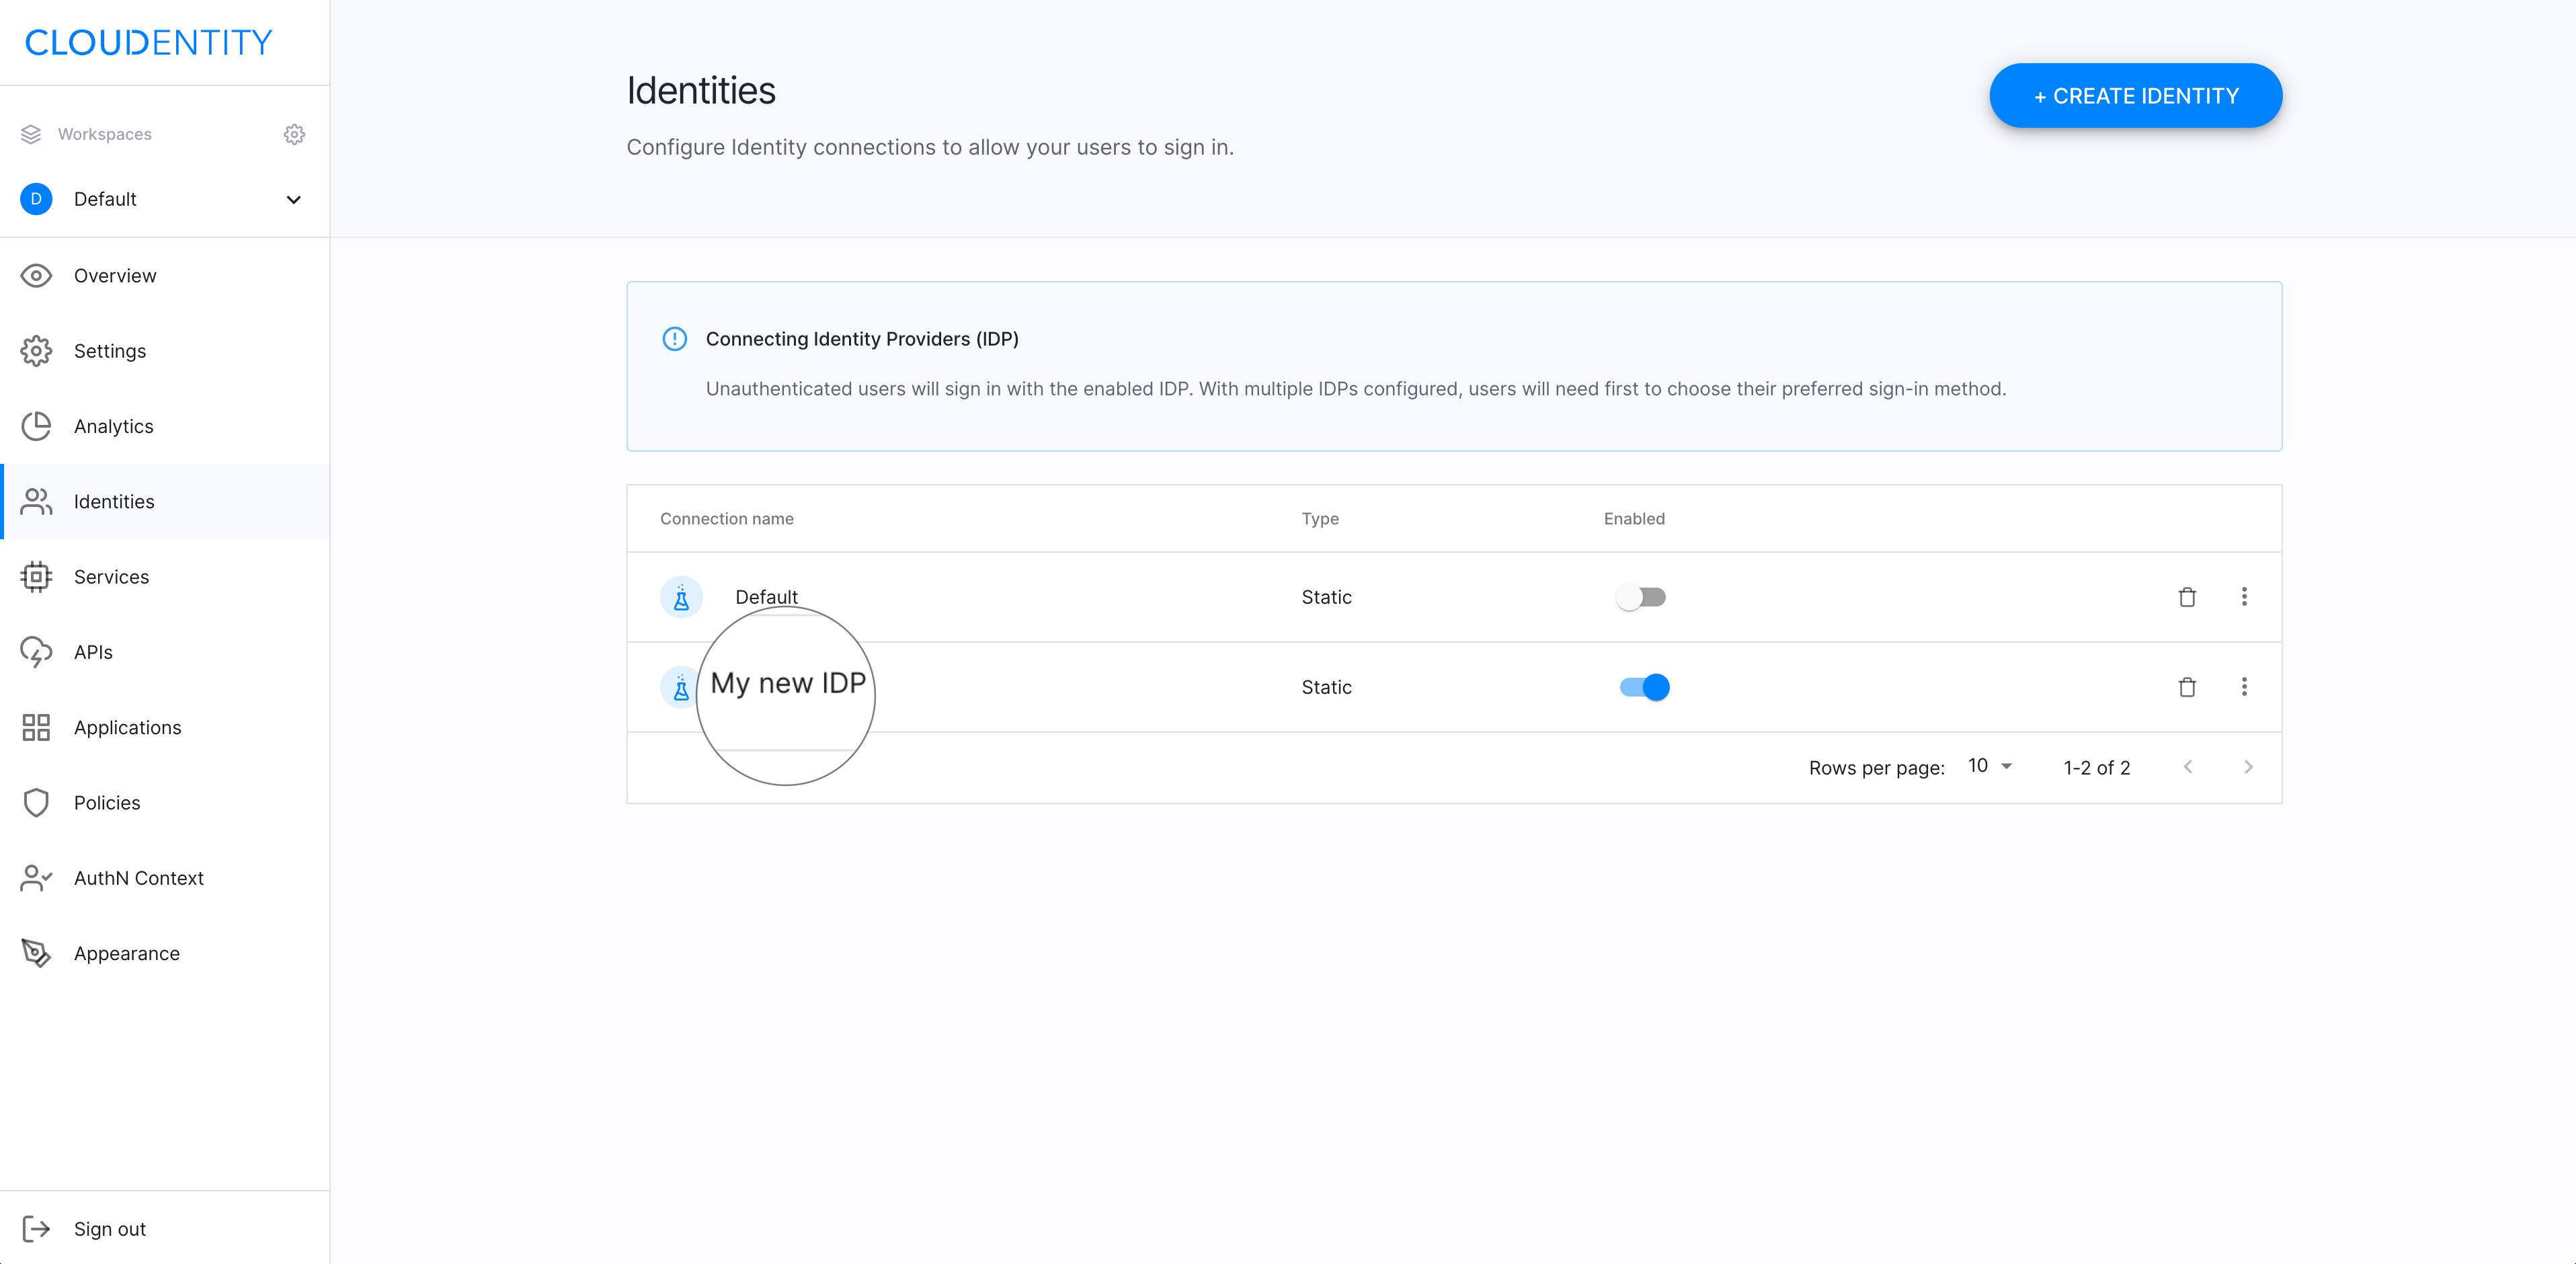
Result
Your new static IDP is visible in ACP as an identity within your workspace.
Read more
For more details, see the createStaticIDP API documentation.
Update the IDP configuration
You can configure your new IDP using the updateStaticIDP API. To learn how to update the IDP configuration, see Enrich authN context for mock users, which shows how to configure your IDP to enrich the mock users identity (authentication) context.