Connecting with a custom IDP
Instructions on how to connect a custom IDP to ACP
Process overview
To manage user access, the Cloudenity ACP offers:
-
Third-party Identity Providers provided out of the box
-
A possibility to integrate your custom Identity Provider with ACP through the use of Cloudentity APIs
You can integrate your already exsiting login page with ACP and, then, enable your users to log in to the ACP.
ACP does not provide Identity and Access Management solution to store and manage the users' digital identities. This functionality is a part of the Identity solution.
Integrating with a custom Identity Provider
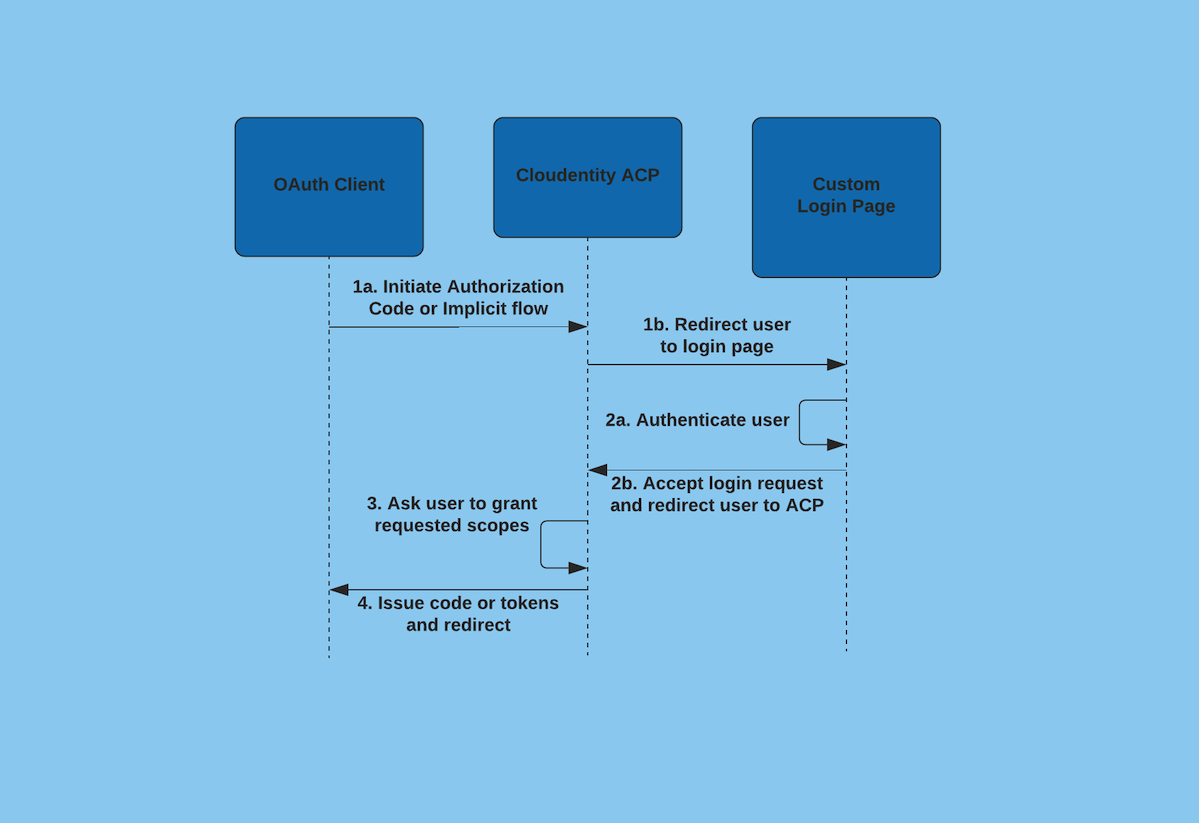
The process of user authentication, when a custom IDP is used, works as follows:
-
The OAuth 2.0 client initiates the authorize code or implicit flow (
1a) and gets redirected by ACP to the custom login page (1b).GET https://authorization.cloudentity.com:8443/default/default/oauth2/authorize ?client_id=my-client &redirect_uri=https://authorization.cloudentity.com:8443/default/default/demo &response_type=code &state=ed92md193j &nonce=d8dfj19s > Status: 302 > Location: https://demo.cloudentity.com/login?login_id=43579ea6860f6&login_state=29n93 -
The custom login page, once the user has successfully logged in (
2a), calls ACP to accept the login request and redirects the user to the returned redirect URL (2b).Note
The custom login page must pass
login_statefrom query parameters to accept the login request body and uselogin_idfrom query parameters asidin the accept login request path.curl -X POST "https://authorization.cloudentity.com:8443/api/system/default/logins/43579ea6860f6/accept" \ -d '{ "auth_time": "2019-11-20T08:20:46.294Z", "subject": "user@example.com", "login_state": "29n93"}' \ -H "Authorization: Bearer PUT-YOUR-ACCESS-TOKEN-HERE" > {"redirect_to": "https://authorization.cloudentity.com:8443/default/default/oauth2/authorize?..."}The accept login request endpoint requires authentication.
2.1. In the admin authorization server of the same tenant that you are building the custom login page for, create a client and use its
client_idandclient_secretto issue the access token.Note
Make sure the client credentials grant flow is enabled.
2.2. Replace
PUT-YOUR-ACCESS-TOKEN-HEREwith the access token issued by the admin authorization server. -
ACP checks if the login request has been accepted and redirects the user to the ACP consent page.
GET https://authorization.cloudentity.com:8443/default/default/oauth2/authorize ?client_id=my-client &login_verified=true &nonce=d8dfj19s &redirect_uri=https://authorization.cloudentity.com:8443/default/default/demo &response_type=code &login_id=43579ea6860f6 &login_state=9d2k5 &state=123456789 > Status: 302 > Location: https://authorization.cloudentity.com:8443/default/default/scope-grant?login_id=43579ea6860f6&login_state=7sj23 -
The ACP consent page asks the user to grant requested scopes. Upon approval, it accepts the consent request and redirects the user to the returned redirect URL.
-
ACP checks if both login and consent requests have been approved. If so, it issues the authorization code (or access and ID tokens in the case of the implicit grant flow) and redirects the user to the redirect URL.
GET https://authorization.cloudentity.com:8443/default/default/oauth2/authorize
  ?client_id=my-client
  &consent_verified=true
  &nonce=d8dfj19s
  &redirect_uri=https://authorization.cloudentity.com:8443/default/default/demo
  &response_type=code
  &login_id=43579ea6860f6
  &login_state=7sj23
  &state=123456789

> Status: 302
> Location: https://authorization.cloudentity.com:8443/default/default/demo?code=...
APIs
You can find all ACP login APIs here.
There are three internal-only APIs provided by administrative ACP endpoints that can be used in the authentication and consent approval flow:
-
GET
/api/system/{tenant_id}/logins/{login_id}for getting login request details -
PUT
/api/system/{tenant_id}/logins/{login_id}/acceptfor accepting the login request -
PUT
/api/system/{tenant_id}/logins/{login_id}/rejectfor rejecting the login request
login_id is provided as a query parameter when the user gets redirected to the
login or consent page from the ACP authorize endpoint.
The authorize endpoint is protected using CSRF cookies. If cookies that are associated with a given login are missing, the authorization code (or token) is not issued.
Implementation
The custom login and consent application provides the /login endpoint.
login_id can be read from query parameters. The request can be approved immediately
if the user has already been logged in. Otherwise, the login form gets displayed.
The custom login redirects the user to the URL returned from accept or reject login endpoints.
Configuration
You need to update the authorization server login_url attribute.
Learn more
See APIs for more information.
Connecting custom IDPs to ACP
Prerequisites
-
You have already set up your first workspace in ACP.
-
You have already integrated your custom IDP with ACP.
Select a workspace
-
Go to the ACP administrator portal in your browser and log in with your credentials.
-
From Workspace Directory, select a workspace that you want to enter.
Add an identity provider
-
Go to Identities.
-
Click ADD IDENTITY to create a new IDP.
-
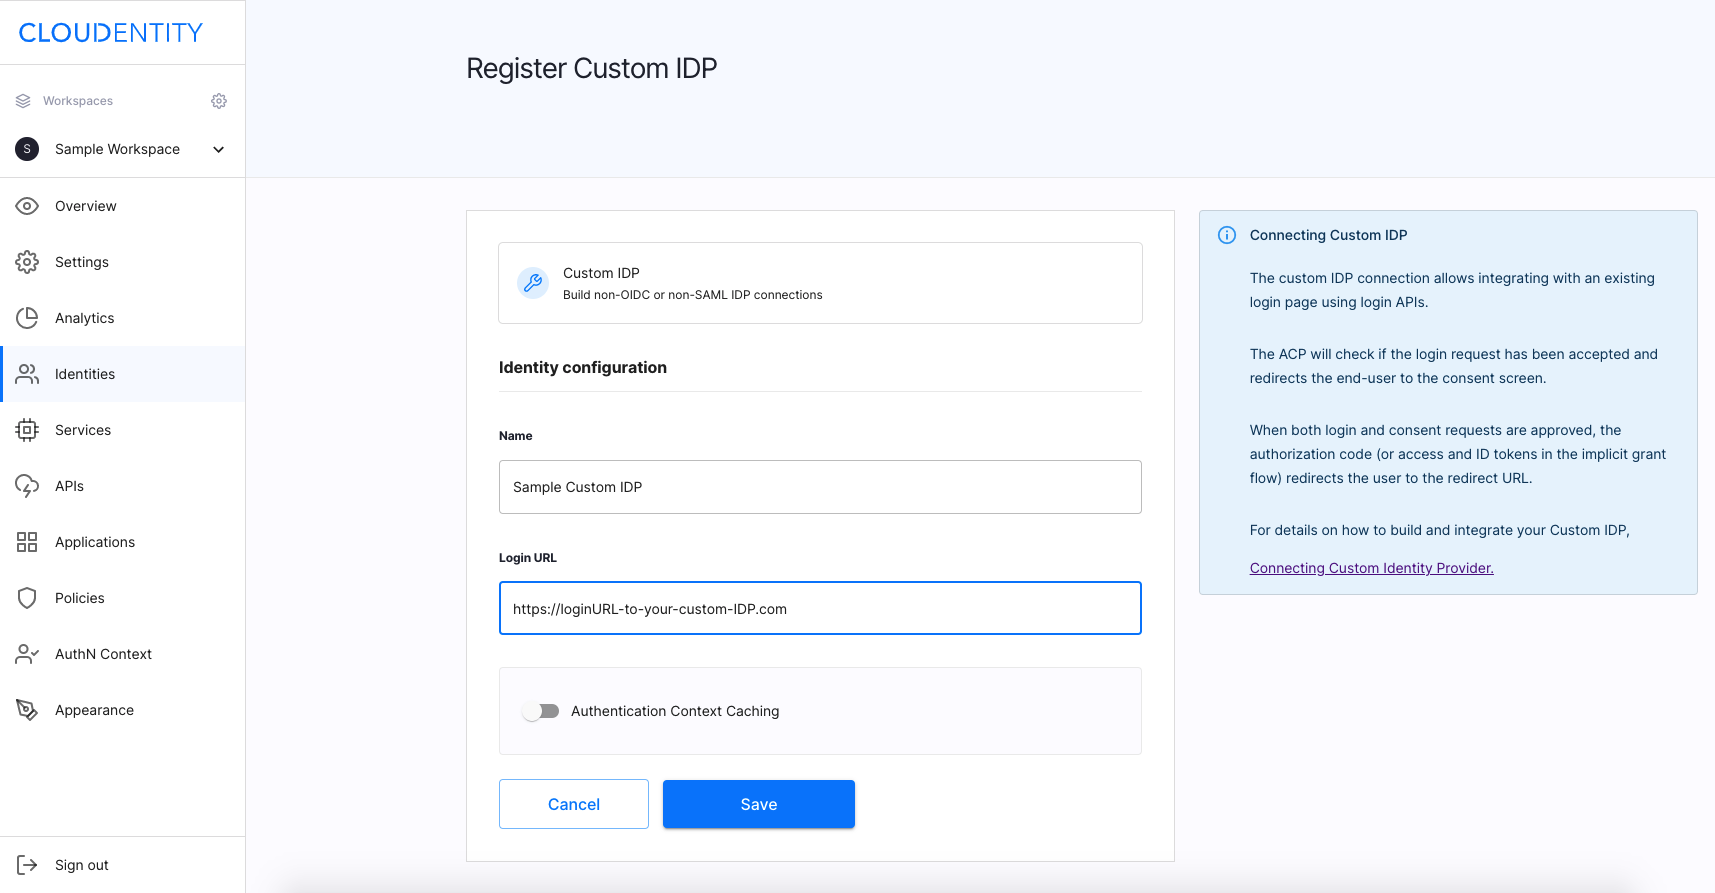
In the Add new provider view, select Custom IDP, enter the name for your IDP, and click Next.
-
In the Register Custom IDP view, enter the login URL for your IDP that you have integrated with ACP, and select Save.
Result
You have enabled your users to connect to Authorization Control Plane using your custom login page.
Configure advanced settings
Go to Identities in the left sidebar and select your IDP from the list of available IDP connections.
Configure IDP settings
To configure your new IDP advanced settings:
-
Make sure that you are in the Configuration view and select Advanced settings at the bottom.
-
Select Authentication Method Reference from the dropdown menu.
-
Select Save.
Configure authentication context attributes
You can configure authentication context attribues for your custom IDP.
Read more
To know more about authentication context attributes, see the authentication context documentation.
To add an attribute:
-
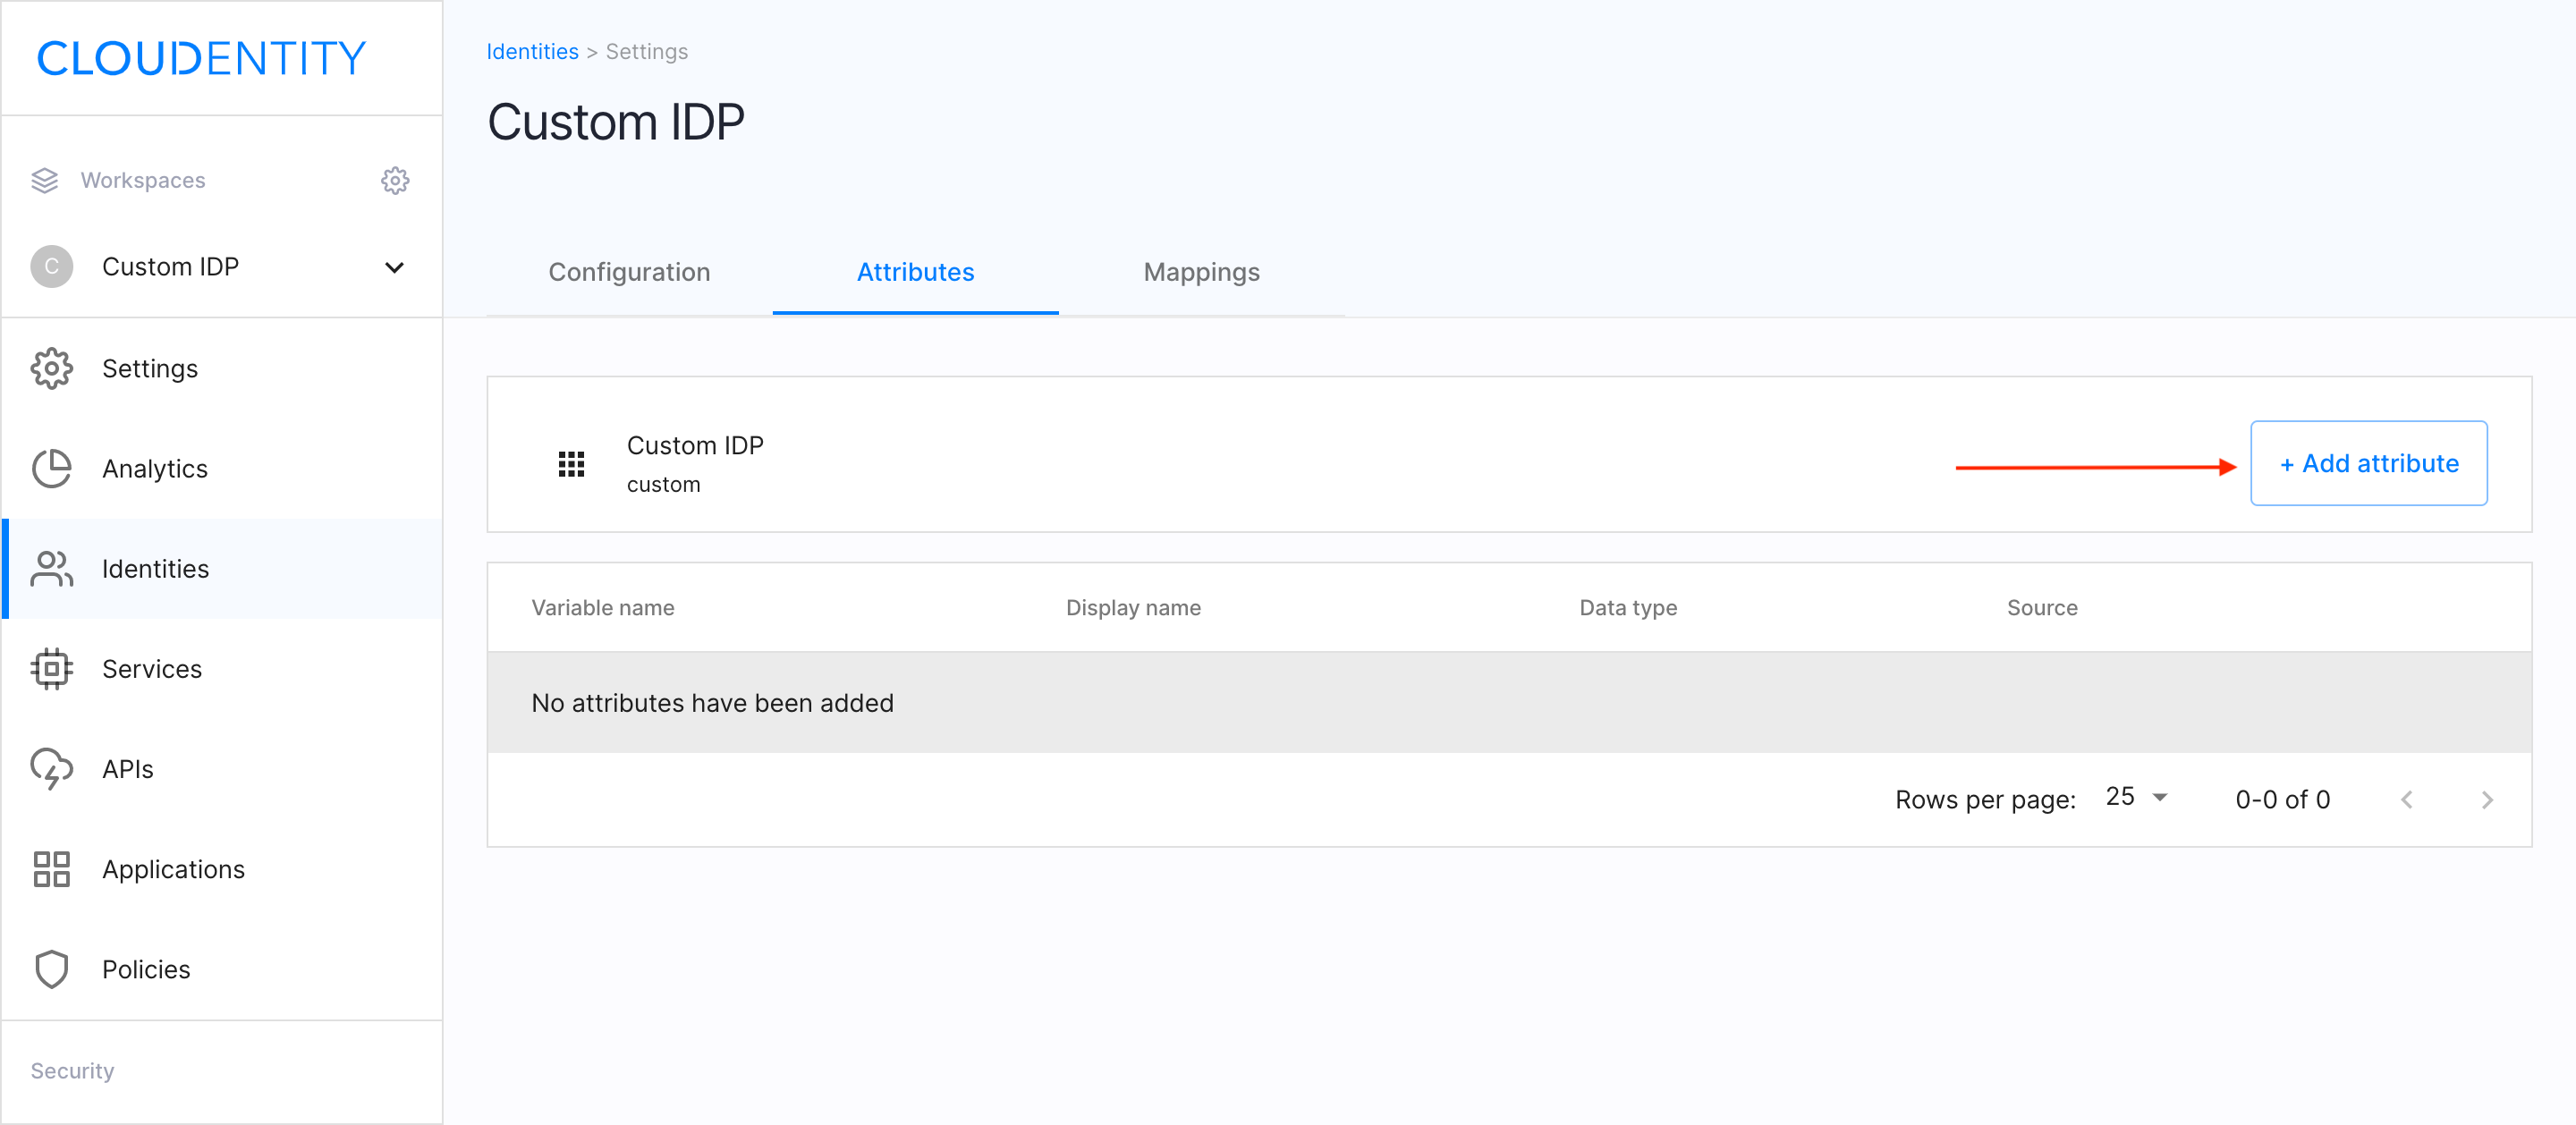
Select the Attributes view.
-
Click the Add attribute button.
-
In the Add attribute window, specify the following features:
- Source (ID token, Access token, User object, Root)
- Display name
- Variable name
- Data type
-
Click Next.
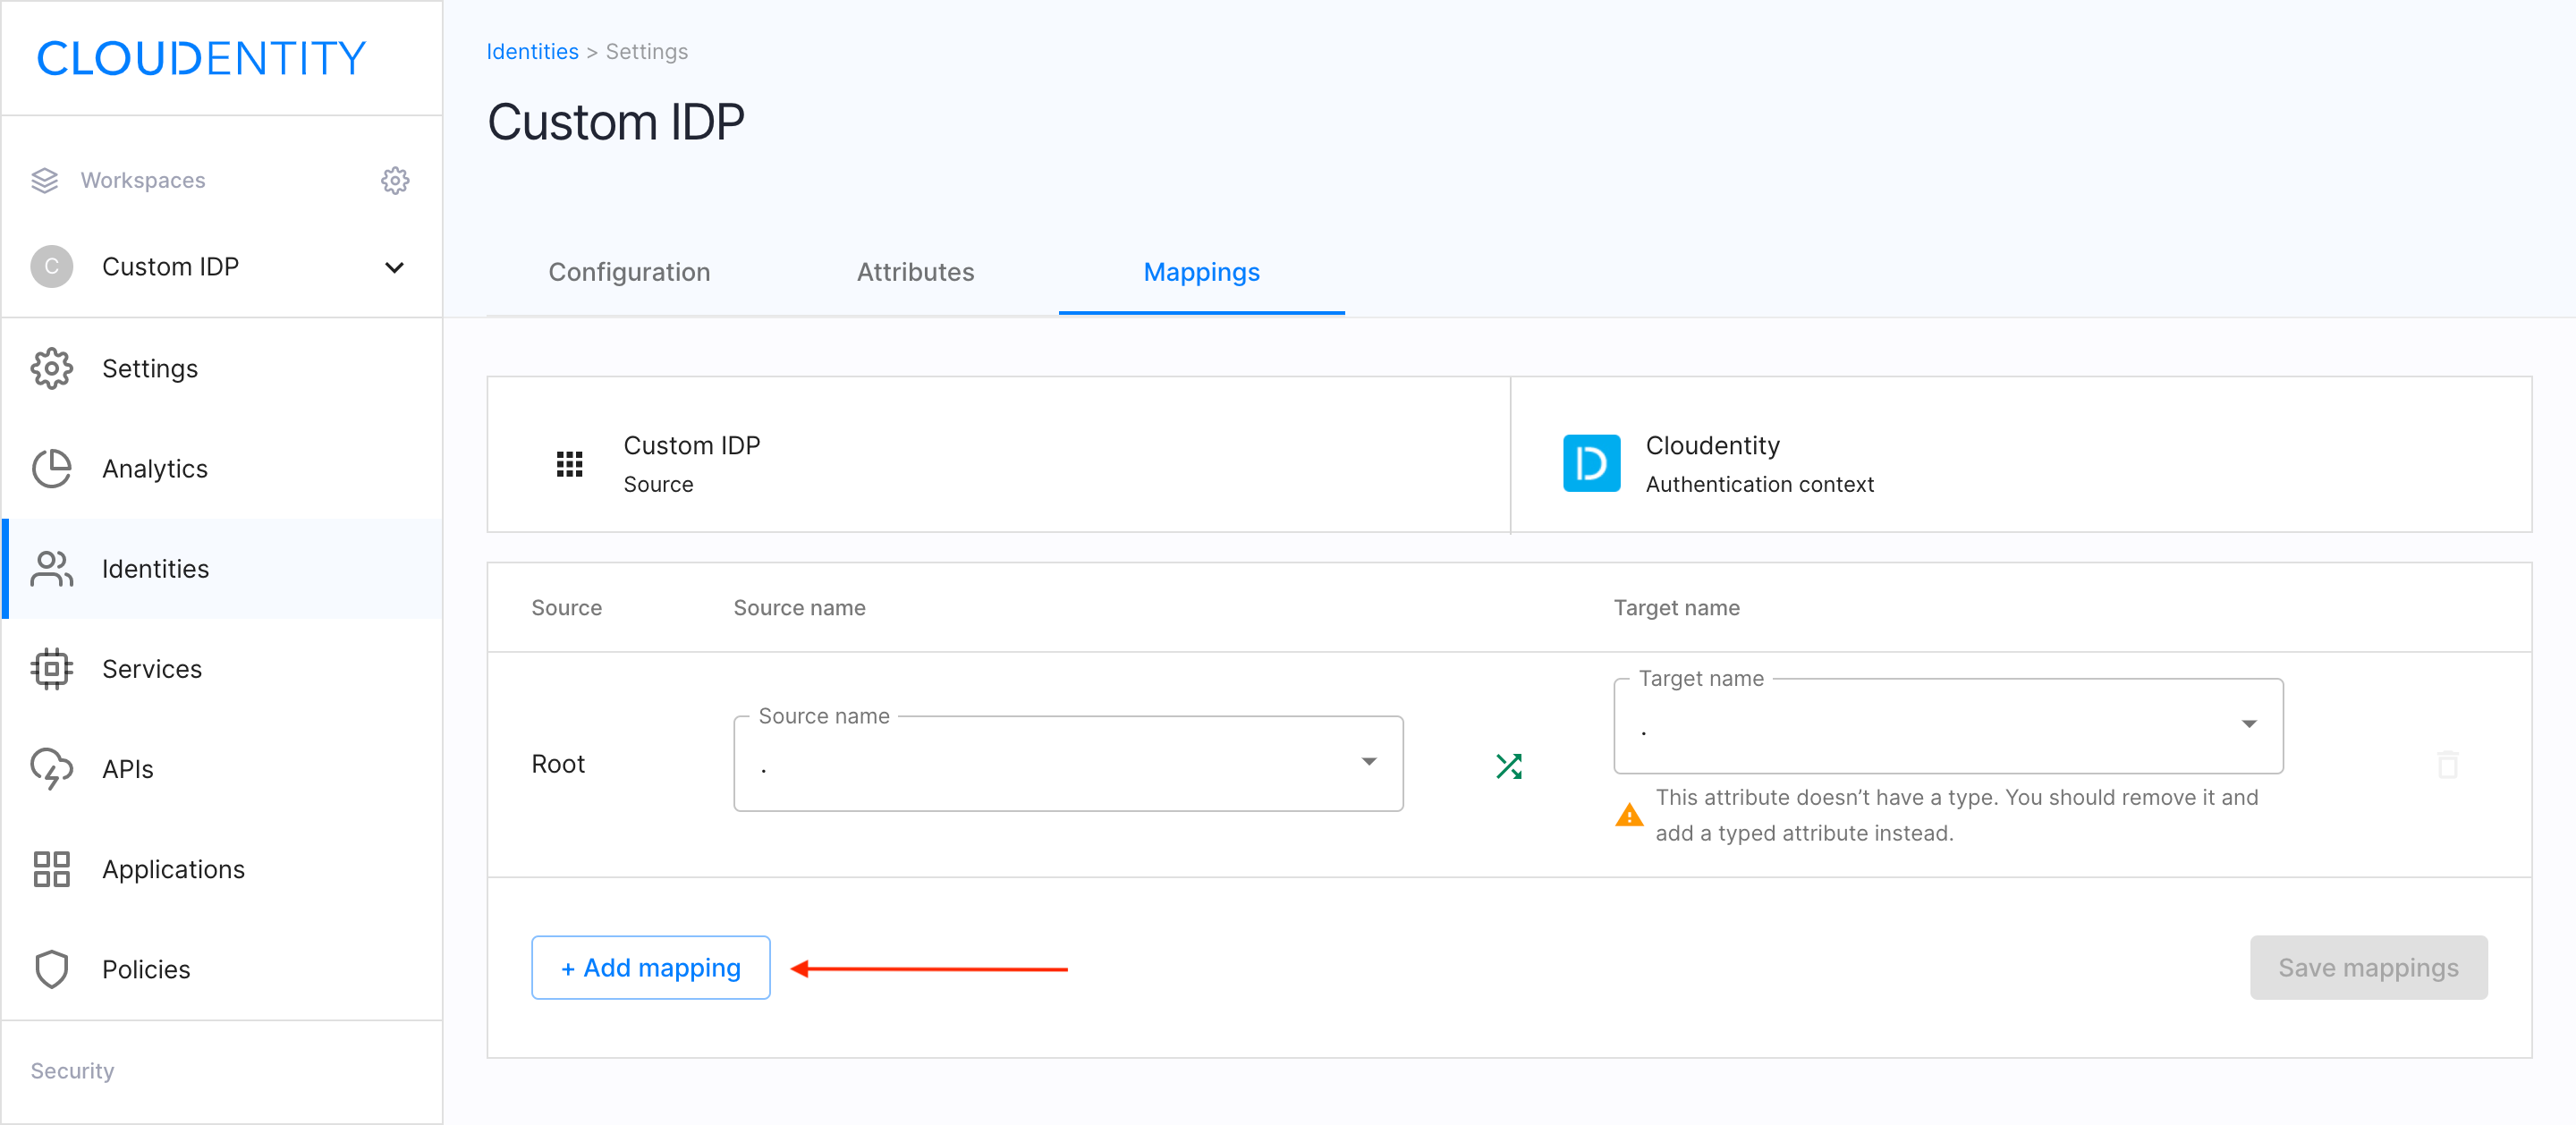
Configure mappings of the attributes
You can map your IDP attributes between your custom IDP and the authentication context.
Read more
To know more about mapping authentication context attributes, see the mapping documentation.
To add a mapping:
-
Select the Mappings view.
-
Click the Add mapping button.
-
Provide the following information on:
- Source name
- Target name
Enable stateful authorization
This step is optional.
To have the user’s data cached in ACP and avoid re-authenticating within one use’s session, follow the instruction in Enable the stateful authZ in ACP.
User’s test
Test your connection between the ACP and your custom Identity Provider as a user.
Prerequisites
Your provider is configured as a user-authentication method by your administrator.
Test
-
Use the URL of your existing workspace and select Demo application.

-
In the displayed Demo application window, click LOG IN TO DEMO APP.
-
Select your configured IDP (if you have multiple IDPs) and, next, authenticate in the IDP.
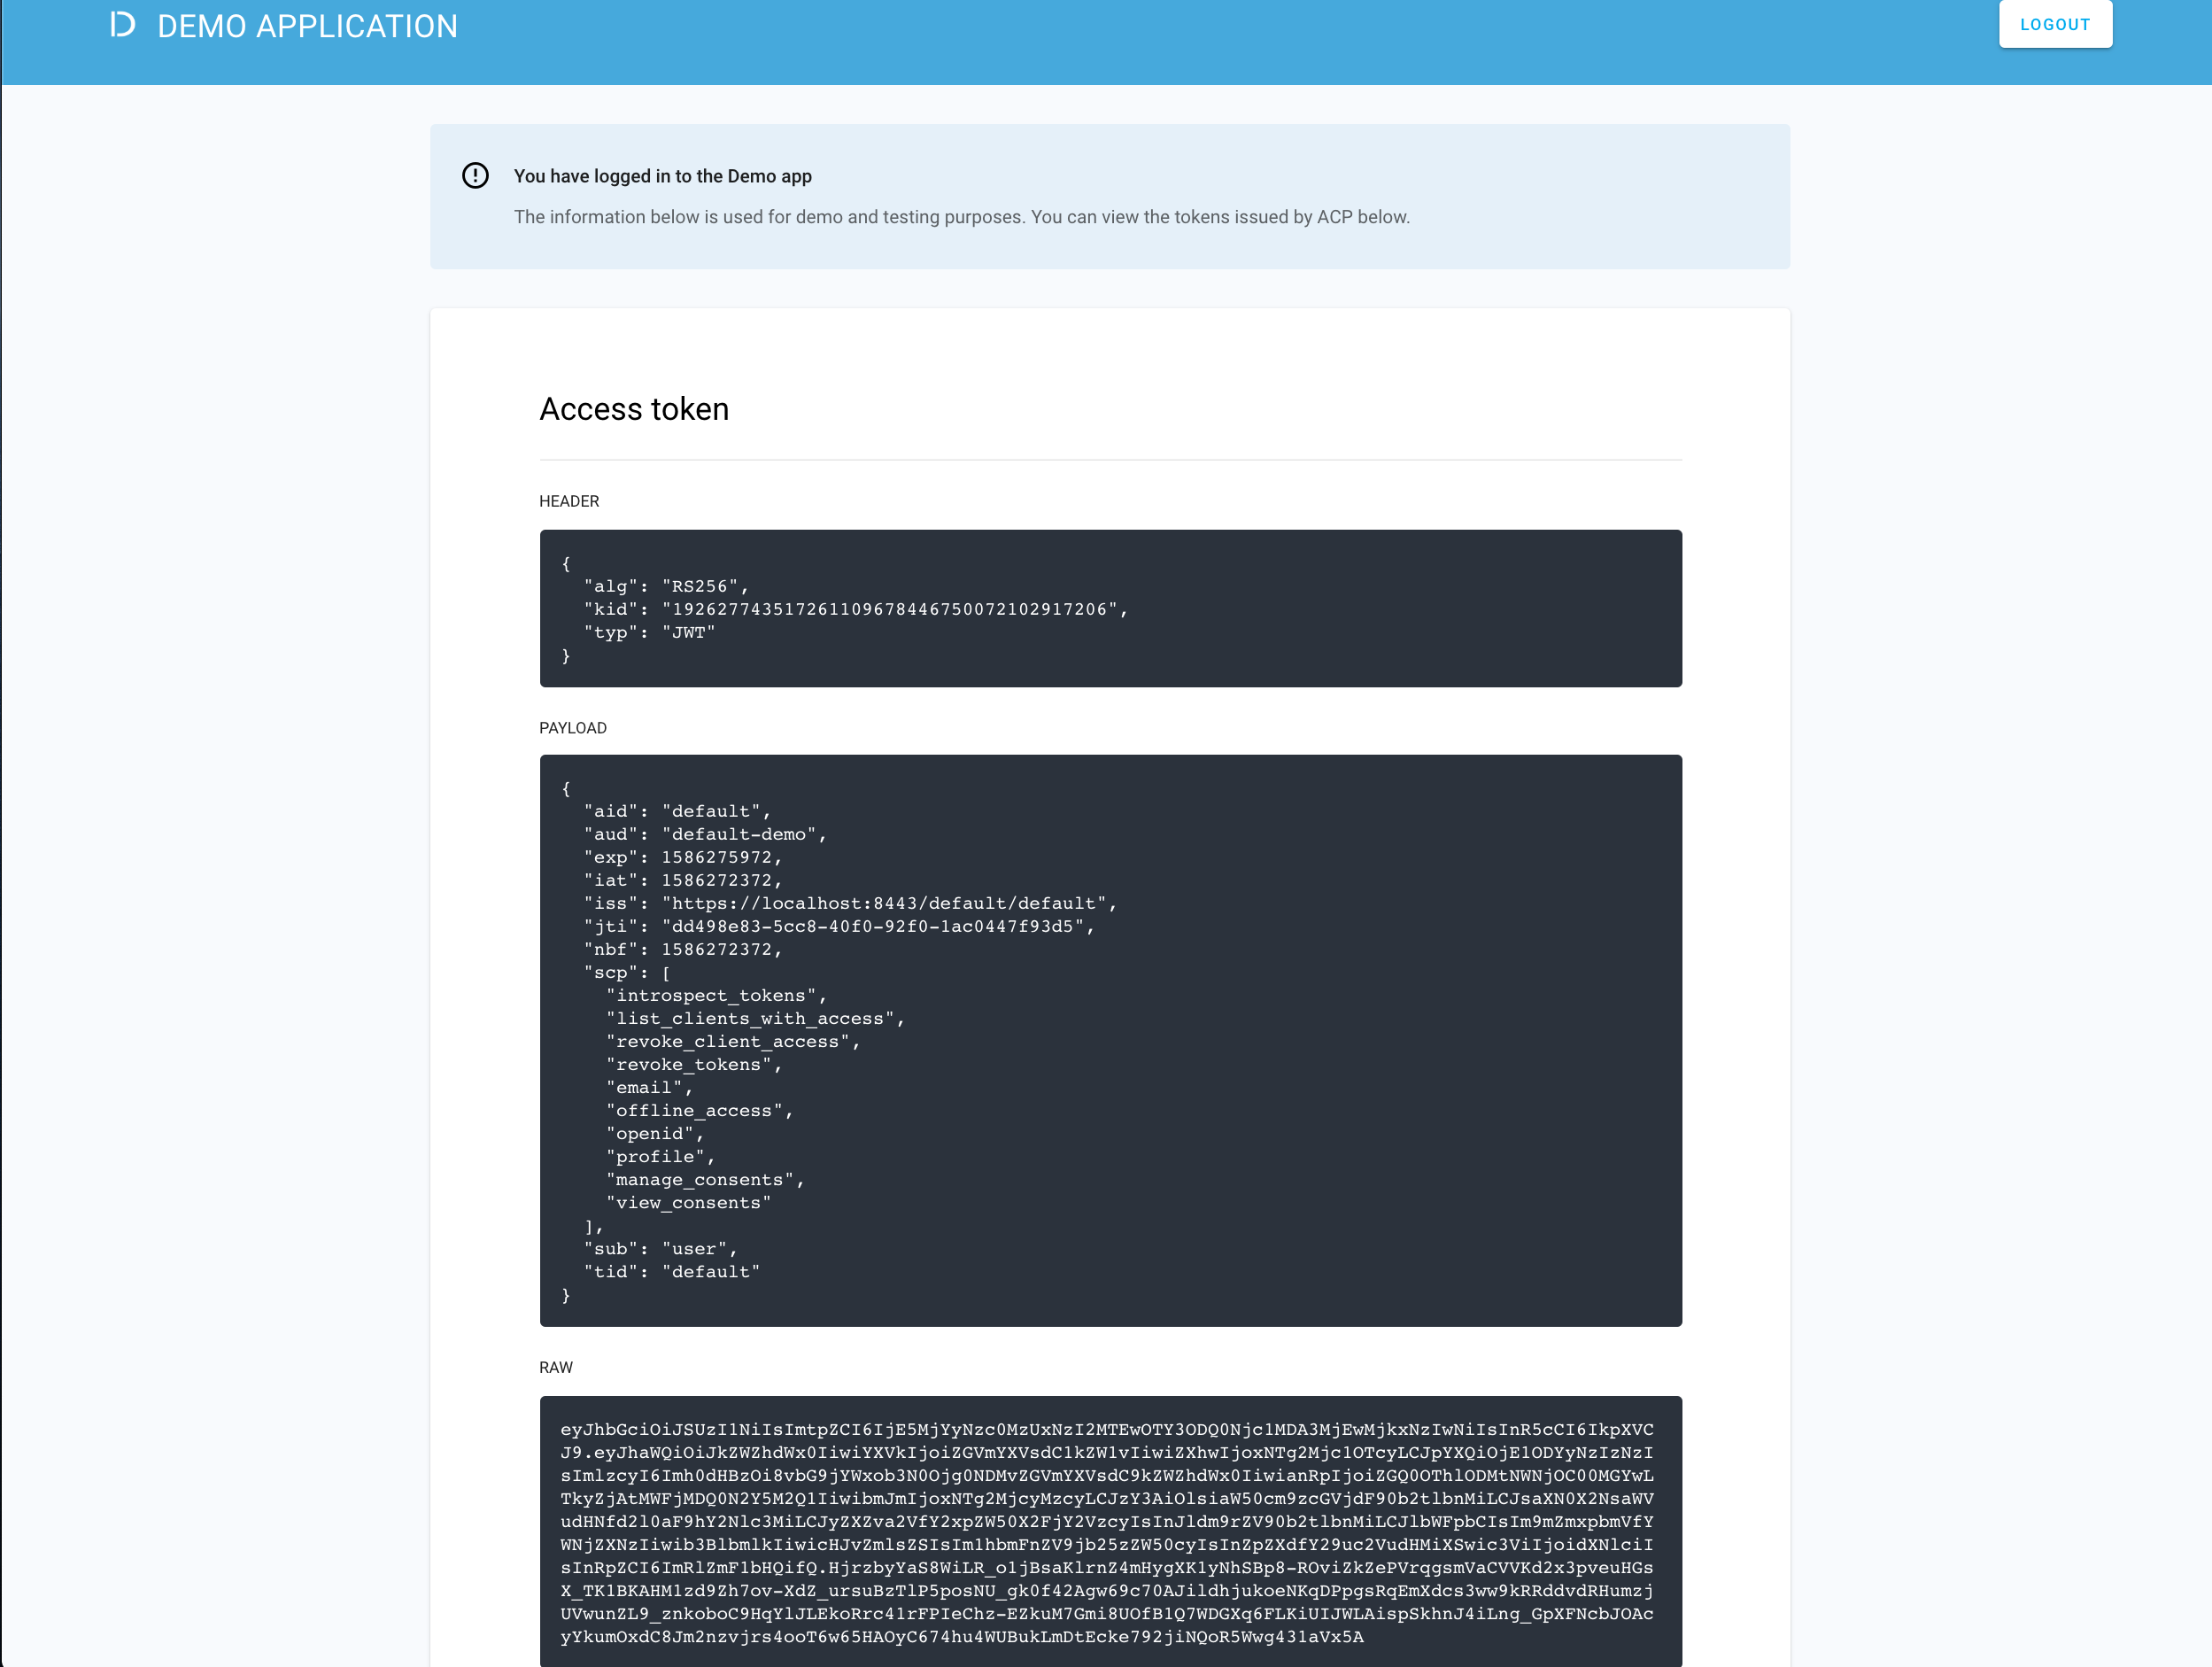
Result
ACP displays the consent page that lists data scopes to be shared with the application. When you proceed to the application (ALLOW ACCESS), the PII data coming from the IDP is delivered through the access token and the ID token generated by ACP.
Read more
For information on granting and managing ACP consents, see ACP OAuth consents.
Developer’s test
Test your connection between the ACP and your custom Identity Provider as a user.
Prerequisites
Your provider is configured as a developer-authentication method by your administrator. To register your IDP for the developer, follow the instructions in Configure IDP, this time selecting the Developer workspace in step 2.
Test
-
Use the URL of your existing workspace and select your ACP developer portal to access it.
-
Log in to your account by entering your login credentials and selecting LOG IN.
Result
You are logged in to the ACP developer portal with the newly-configured IDP.