Connecting to Okta IDP using SAML 2.0
This article describes how to integrate ACP with Okta IDP using SAML 2.0.
About SAML
Security Assertion Markup Language (SAML) is an XML-based open standard that allows to transfer user’s identity data between the identity providers and the service providers.
SAML has its benefits that include the following:
-
Improved user experience
SAML allows the users to use the Single Sign On (SSO). The user can authenticate with the IDP and then access the service protected by ACP without additional authentication.
-
Reduced costs of administration for service providers
SAML reuses a single act of authentication for multiple times, which may reduce costs of maintaining account data.
-
Risk transfer
Using SAML shifts the responsibility for identity management and IAM-related risks from the service provider to the identity provider.
Prerequisites
- You have an Okta developer account.
Connect Okta SAML IDP
-
In ACP, go to Identity Data > Identity Providers > Create Identity.
-
Choose SAML and select NEXT.
-
Follow Okta’s documentation to create a SAML application in Okta. Perform Task 1 and Task 2, click Next, then come back to this instruction.
-
In the Configure SAML tab, select Download Okta certificate.
-
Copy the contents of the downloaded
.certfile.Example
The certificate should look similar to the following:
-----BEGIN CERTIFICATE----- MIIDvDCCAqSgAwIBAgIGAXnRtHz2MA0GCSqGSIb3DQEBCwUAMIGeMQswCQYDVQQGEwJVUzETMBEG A1UECAwKQ2FsaWZvcm5pYTEWMBQGA1UEBwwNU2FuIEZyYW5jaXNjbzENMAsGA1UECgwET2t0YTEU MBIGA1UECwwLU1NPUHJvdmlkZXIxHzAdBgNVBAMMFmNsb3VkZW50aXR5LXdrb3Rsb3dza2kxHDAa BgkqhkiG9w0BCQEWDWluZm9Ab2t0YS5jb20wHhcNMjEwNjAzMTE0NzU3WhcNMzEwNjAzMTE0ODU3 WjCBnjELMAkGA1UEBhMCVVMxEzARBgNVBAgMCkNhbGlmb3JuaWExFjAUBgNVBAcMDVNhbiBGcmFu Y2lzY28xDTALBgNVBAoMBE9rdGExFDASBgNVBAsMC1NTT1Byb3ZpZGVyMR8wHQYDVQQDDBZjbG91 ZGVudGl0eS13a290bG93c2tpMRwwGgYJKoZIhvcNAQkBFg1pbmZvQG9rdGEuY29tMIIBIjANBgkq hkiG9w0BAQEFAAOCAQ8AMIIBCgKCAQEA0bYLhHZXo/oKxMtKMUUaAmkbgr0U9f/KYBosVQmTPoKe S/dg3OQYEmUozVbu07COPdJ3gz8CcXf0NIxjhf9Fso2vrbRfAisdxJjh/ec0Q2YR5hisTWGF0ZCZ YoTiI2pGnCmnqLhBLuEdvew+hhqi3knZ2yoobiUuwj0UXOzOW4RmaPRCmu1MvJl1BWJ9IykQAfEM L61fr1fpfymZ857MDmGPp7XnHCz/6duZ4yfzqV2QRNvP6kM/DesWvakO/fMEbc8Lkv4pKRfltWcq yF4jCxObA9NxVf8lEaIJ74QqMo7uUs4wXnld9ff5I1D9ygjwO114yV41TdZTTqQMnXbGGQIDAQAB MA0GCSqGSIb3DQEBCwUAA4IBAQBAvmbUn7pcTn5XKtW+HnzYOUdtqHq5Sg8KROaRFvMpQylrRqJe t2qtRhs9k17pHyGCzKRZUnGS8Jj/X1ZWa1M8fAlzb33chCNKlz8Ei34r9Fk7j6FmvgmAZwZIwpL1 Ffss3dJ0eGyWMWtSO2ifPrV3jZ85vDAw3iFToujosxJHuEOU6pIPFS3eZ0TfbrRZJiKDkX08ISLg P4hu3khLd5bRx4BvLKGlPppF2ls4str4pjBiC4DuUNVo+C7XAQjyjdCv8P2TQZKQeo8OkpRM1EW3 DpRLRM3dtzJ7xbOPZBb5tFAuLr/sHdqsQ5k/WUKu5srZpS+oGN6Gs/ScO2RwGZnN -----END CERTIFICATE----- -
Fill in the SAML connector form in ACP.
Field Description Name Name of your connector. This name is displayed in the user authentication UI. Sign-in URL URL pointing to your Okta SAML IDP application’s SSO endpoint. Enter an initial dummy value to pass form validation if you don’t have this application yet. IDP certificate Certificate of your SAML IDP application. You need to obtain it from the application itself. Identifier source Defines how the user identifier is extracted from the SAML assertion received from the IDP. If you select Subject as the identifier source, the identifier is retrieved from <saml2:Subject>. If you choose Attribute, you need to enter a user attribute name into the Identifier attribute field. If you select the attribute as the identifier source, the identifier is retrieved from<saml2:AttributeStatement>. Any attribute from<saml2:AttributeStatement>can be used for that purpose. -
Select SAVE.
Result
Your new SAML identity provider is created and listed in the Consumer Identity Providers view.
Entity issuer and Redirect URL (or Assertion Consumer Service (ACS)) are generated in ACP. Use these values to finish the configuration on the SAML application side.
-
Copy the Entity issuer value from ACP and paste it in the Okta’s Audience URI field.
-
Copy the Redirect URL value from ACP and paste it in the Okta’s Single sign on URL field.
-
Configure the rest of the fields as needed and select Next. If necessary, use Okta SAML documentation for help.
-
Provide your feedback for Okta when prompted and select Finish.
Result
Your application is created.
You are now able to provide a correct Sing in URL in your ACP SAML IDP configuration.
-
Click View Setup Instructions.
-
Copy the Identity Provider Single Sign-On URL value.
-
Go to ACP > Identities > Your SAML IDP.
-
Paste the URL in the Sign in URL and select Save.
Result
Your SAML IDP is configured and ready to be used.
Advanced configuration
Advanced settings contain optional features which may be necessary to use in specific cases. To configure your new IDP advanced settings
-
From the Identity Data > Identity Providers > YOUR_IDENTITY_PROVIDER > Configuration page, select Advanced settings at the bottom.
-
In the Authentication Method Reference you can select an authentication method to be written into the
amrobject returned by the IDP. Theamrobject is written if it doesn’t exist. If it exists, its values are replaced with the selected item.Tip
You can also use an extension script to modify
amrvalues. If you do, keep in mind that the script is executed after theamrinjection from this field, so the values injected by the script are final. -
Optionally, enable the Skip inResponseTo option. This is not recommended since it lowers the security level of your system, as the login is treated as IDP-initiated. You may need to turn this flag on when the
InResponseToparameter is not returned by the IDP. -
Select Save.
Add SAML IDP attributes
Make sure to add attributes sent by your SAML IDP to the IDP connector so that they can be recognized and mapped to the authentication context.
Consider the example below. All attributes within <saml2:AttributeStatement> can be extracted and
mapped to the authentication context.
<?xml version="1.0" encoding="UTF-8"?>
<saml2:Assertion ID="id12606633554344727301514261" IssueInstant="2022-01-12T17:04:07.362Z" Version="2.0"
    xmlns:saml2="urn:oasis:names:tc:SAML:2.0:assertion">
    <saml2:Issuer Format="urn:oasis:names:tc:SAML:2.0:nameid-format:entity">http://www.example.com/exk3ip7ehfTC30ReG5d7</saml2:Issuer>
    <saml2:Subject>
        <saml2:NameID Format="urn:oasis:names:tc:SAML:1.1:nameid-format:unspecified">example@mail.com</saml2:NameID>
        <saml2:SubjectConfirmation Method="urn:oasis:names:tc:SAML:2.0:cm:bearer">
            <saml2:SubjectConfirmationData NotOnOrAfter="2022-01-12T17:09:07.362Z" Recipient="https://cloudentity-gkossobudzki.us.authz.stage.cloudentity.io/cloudentity-gkossobudzki/demo/login"/>
        </saml2:SubjectConfirmation>
    </saml2:Subject>
    <saml2:Conditions NotBefore="2022-01-12T16:59:07.362Z" NotOnOrAfter="2022-01-12T17:09:07.362Z">
        <saml2:AudienceRestriction>
            <saml2:Audience>c7bhamiqs3kro24r4peg</saml2:Audience>
        </saml2:AudienceRestriction>
    </saml2:Conditions>
    <saml2:AuthnStatement AuthnInstant="2022-01-12T17:04:07.362Z" SessionIndex="id1642007047361.940296625">
        <saml2:AuthnContext>
            <saml2:AuthnContextClassRef>urn:oasis:names:tc:SAML:2.0:ac:classes:PasswordProtectedTransport</saml2:AuthnContextClassRef>
        </saml2:AuthnContext>
    </saml2:AuthnStatement>
    <saml2:AttributeStatement>
        <saml2:Attribute Name="employeeId" NameFormat="urn:oasis:names:tc:SAML:2.0:attrname-format:unspecified">
            <saml2:AttributeValue
                xmlns:xs="http://www.example.com/2001/XMLSchema"
                xmlns:xsi="http://www.example.com/2001/XMLSchema-instance" xsi:type="xs:string">JoeDoe123
            </saml2:AttributeValue>
        </saml2:Attribute>
        <saml2:Attribute Name="mail" NameFormat="urn:oasis:names:tc:SAML:2.0:attrname-format:unspecified">
            <saml2:AttributeValue
                xmlns:xs="http://www.example.com/2001/XMLSchema"
                xmlns:xsi="http://www.example.com/2001/XMLSchema-instance" xsi:type="xs:string">test@example.com
            </saml2:AttributeValue>
        </saml2:Attribute>
        <saml2:Attribute Name="https://example.com/groups" NameFormat="urn:oasis:names:tc:SAML:2.0:attrname-format:unspecified">
            <saml2:AttributeValue
                xmlns:xs="http://www.example.com/2001/XMLSchema"
                xmlns:xsi="http://www.example.com/2001/XMLSchema-instance" xsi:type="xs:string">administrators
            </saml2:AttributeValue>
            <saml2:AttributeValue
                xmlns:xs="http://www.example.com/2001/XMLSchema"
                xmlns:xsi="http://www.example.com/2001/XMLSchema-instance" xsi:type="xs:string">super_users
            </saml2:AttributeValue>
        </saml2:Attribute>
    </saml2:AttributeStatement>
</saml2:Assertion>
-
Go to Identity Data > Identity Providers and select an IDP from the list.
-
Open the Attributes page. A standard list of attributes returned by this IDP appears.
-
Select Add attribute.
-
Fill in the attribute form.
Source Description SAML assertion attribute name Attribute received within the SAML assertion sent by the IDP, for example employeeId,mailorgroupsfrom the above sample.Display name Name representing this attribute in ACP Data type Data type of the incoming SAML attribute Claim names with a . character
If the incoming attribute has a
.character in the name, the dot must be explicitly escaped using\.when defining the IDP attribute. For example, claim namehttps://example.com/groupsmust be entered ashttps://example\.com/groups. -
Save your changes and proceed to mapping the attributes to the authentication context.
Map IDP attributes to authentication context
If you’ve added custom attributes for an IDP, you need to make sure they are mapped to the authentication context. You can do it either from the IDP configuration page (as explained here) or use Data Lineage instead.
Default OIDC/SAML attributes are mapped out of the box.
-
Go to Identity Data > Identity Providers and select an IDP from the list.
-
Open the Mappings page. A standard attribute mapping for this IDP appears.
-
Select Add mapping and map any custom IDP attributes to an existing authentication context attribute.
Note
If you need to create new authentication context attributes, read Setting up authentication context.
-
Optionally, assign a post-authentication extension to modify your authentication context before issuing the token to the client. Attributes returned by the script do not need to be separately mapped to the authentication context.
-
Save your changes. Your mapped custom attributes should now be shared in the ID token issued to your client application, given that the target application requests them (you can check this in Data Lineage).
Test your Okta SAML IDP integration
Prerequisites
- Your IDP is enabled for user authentication.
- Demo workspace is created with the Demo Portal connected.
Test
-
Open the Demo Portal (Data lineage -> Demo Portal -> Launch).
-
Select LOGIN TO DEMO APP.
-
Select your configured SAML IDP and, next, authenticate in IDP.
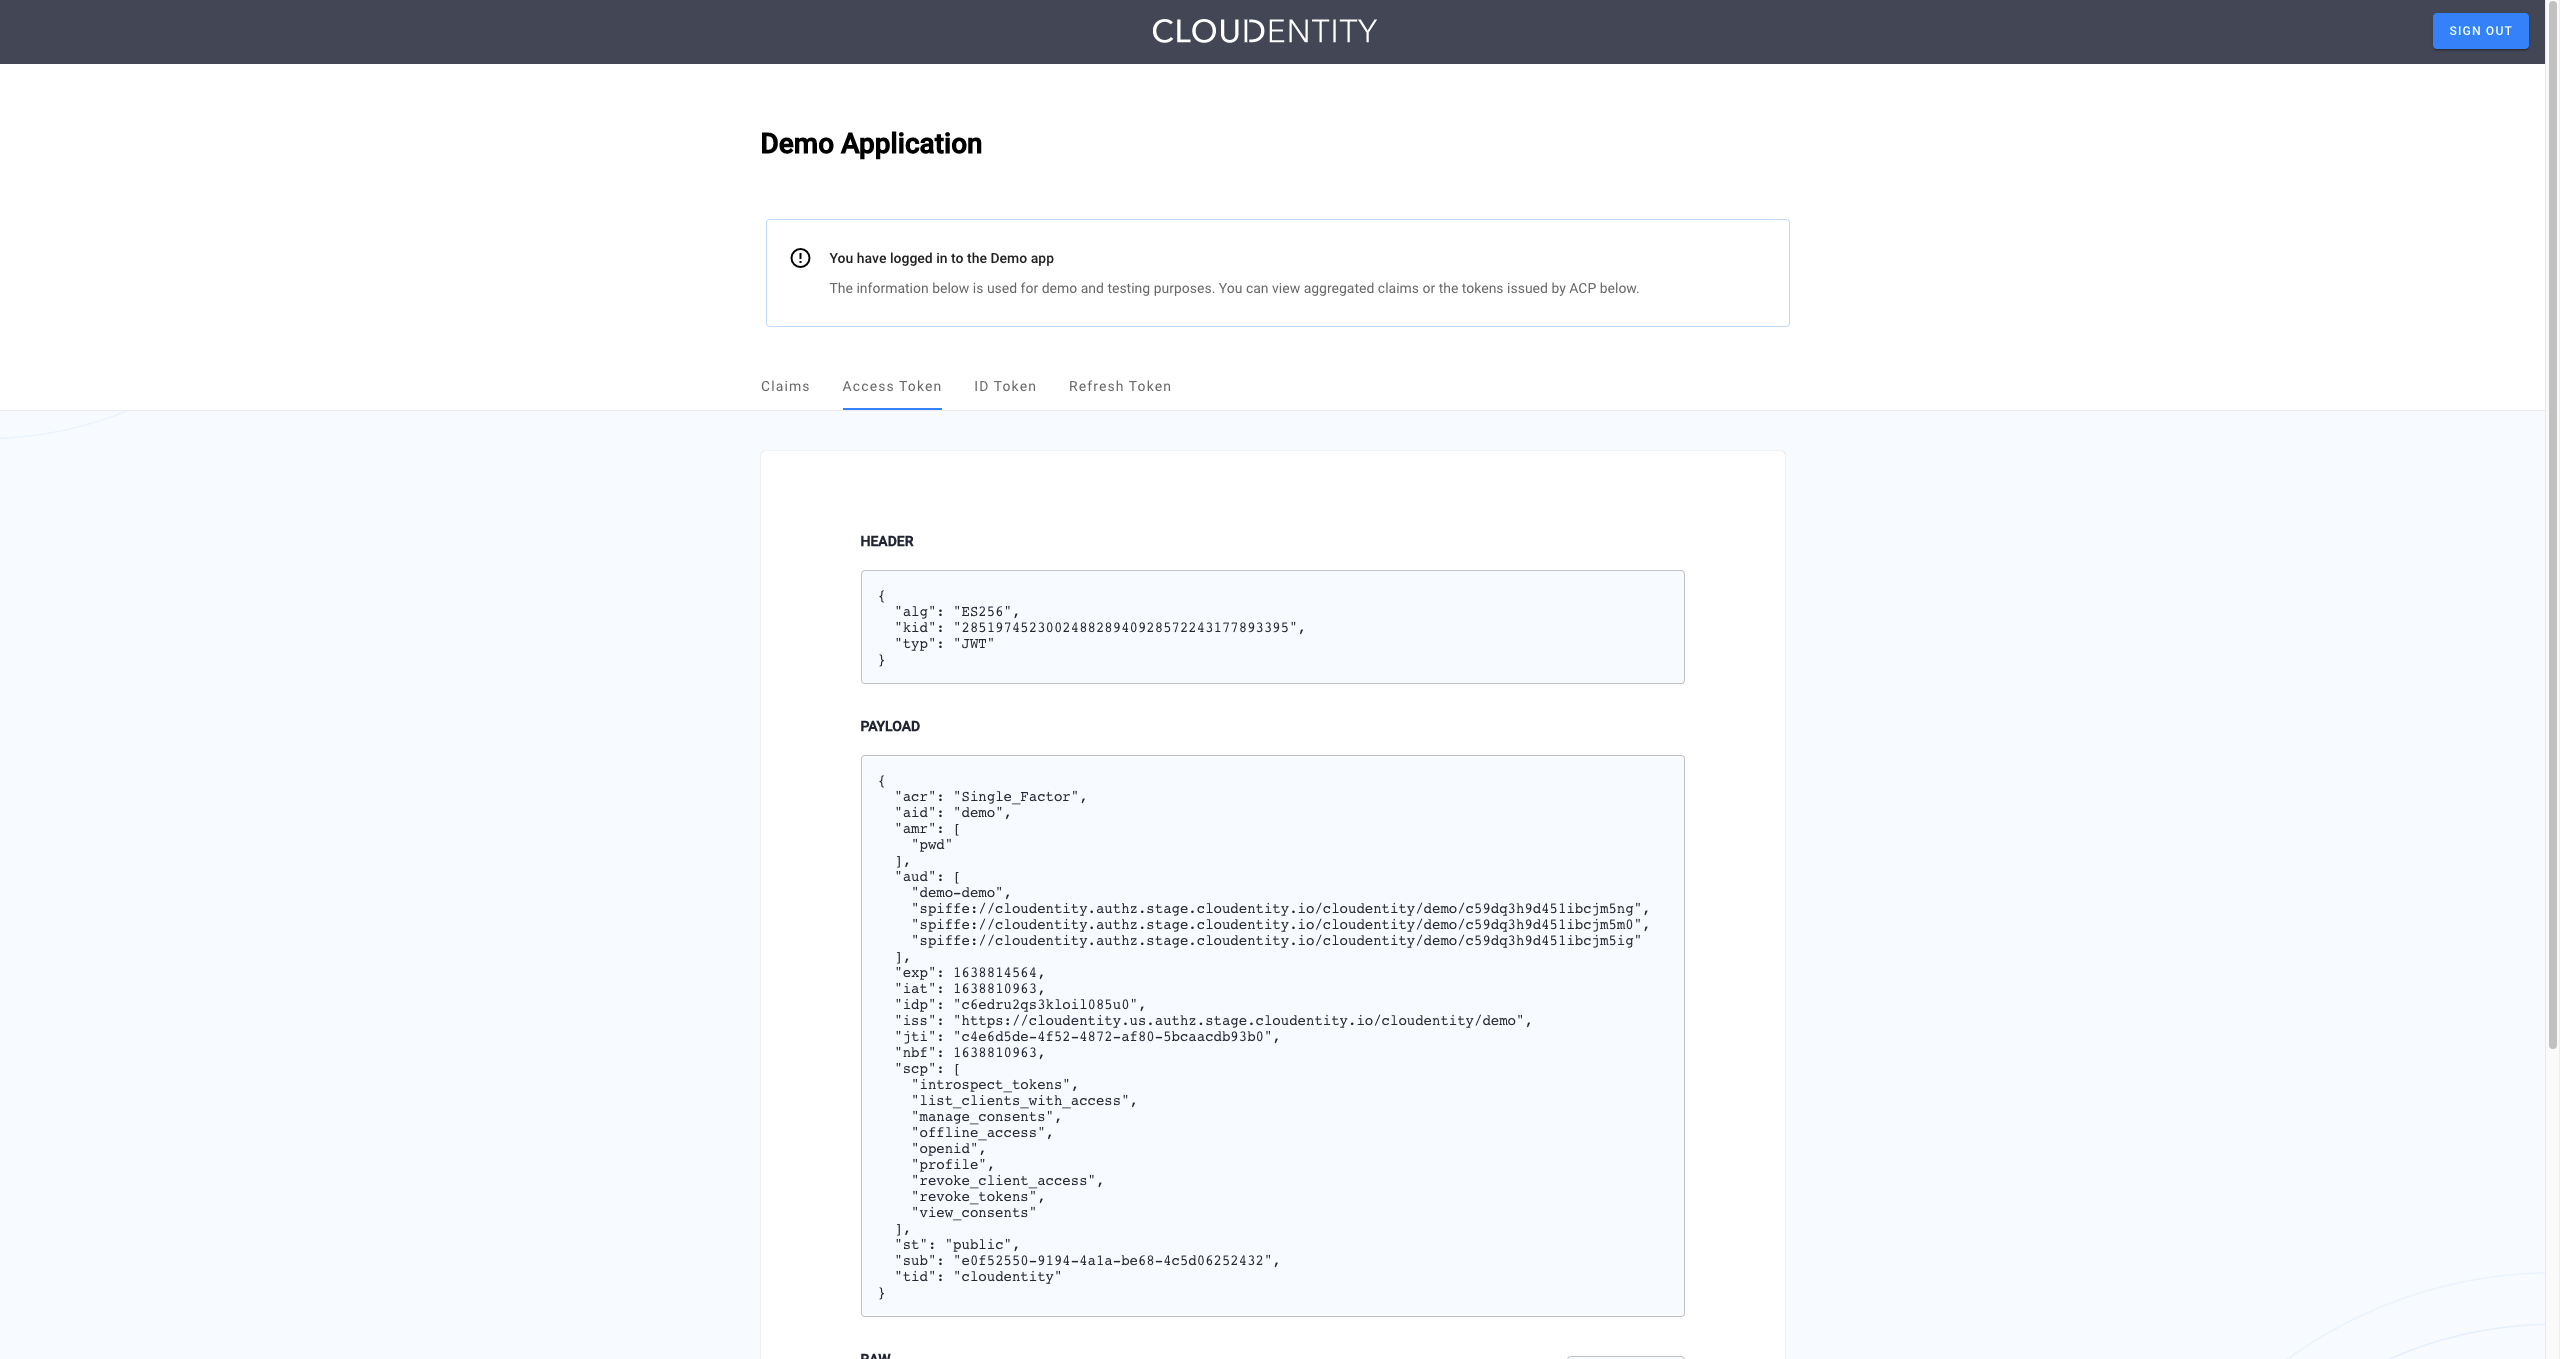
Result
ACP displays the consent page that lists data scopes to be shared with the application. When you proceed to the application (ALLOW ACCESS), the PII data coming from Okta is delivered through the access token and the ID token generated by ACP.
Read more
For information on granting and managing ACP consents, see ACP OAuth consents.