Configuring Identity Pools
Identity Pools allow for the persistent storage of user data within Cloudentity's infrastructure, thus providing the alternative to the Bring Your Own Identity (BYOID) approach typically used by Cloudentity SaaS tenants. Having added an Identity Pool to your tenant, you can connect it as an Identity Provider to specific workspaces so that the end-users can log in to Cloudentity (or register in the Identity Pool first). This document explains how to manage Identity Pools within a tenant and how to add users to Identity Pools as an administrator.
Prerequisites
- Access to an ACP tenant with Identity Pools feature enabled
Add Identity Pools in Tenant
-
Go to Tenant settings > Identity Pools.
-
Select Create New.
-
Add a pool name and description for identification purposes.
-
Select Create. Your pool is created.
-
Select your newly created pool to configure it’s settings and add users.
-
Fill in the Configuration form (some fields are in the Advanced tab).
Field Description Name Name identifying this user pool. Must be unique and contain letters and numbers only (whitespaces are not allowed). Description Description identifying this user pool Payload schema (advanced) Schema for the user data which both users and administrators can input Metadata schema (advanced) Schema for the user metadata (read-only for users, can be edited by administrators) Authentication Mechanisms (advanced) Defines which authentication mechanisms (password and/or OTP) are available for Identity Providers created from this user pool Public Registration Allowed (advanced) Controls if this user pool is open to public user registration Settings Impact
The video below shows what happens on the end user’s side when you disable the OTP authentication and public registration in the Identity Pool.
-
In the OTP settings form, you can set the parameters for One-Time Passwords.
-
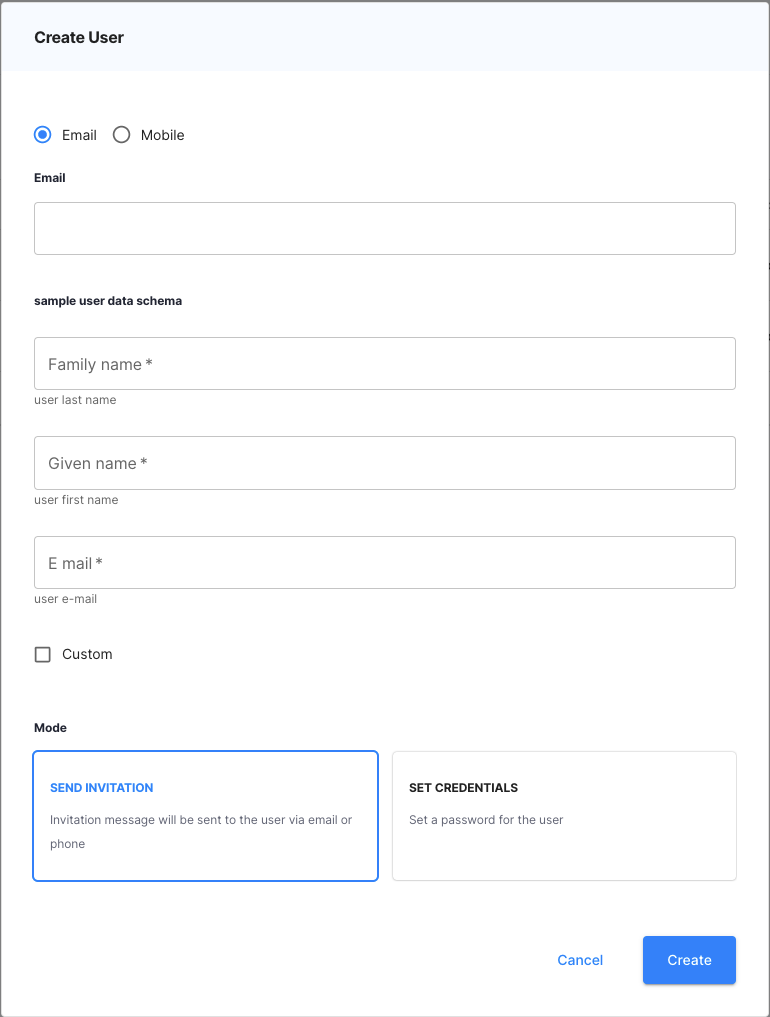
Optionally, add the users in the Users form. If you only want users to register via the self-registration option, you can skip this step. The information below is based on the default user schema, which can be changed.
Field Description First name User’s first name Last name User’s last name Email/mobile User’s means of contact for the purpose of account activation and/or password resetting Send invitation/set credentials Send invitation - user will receive a message allowing them to activate their account. Set credentials - set a password for the user as an administrator. If this option is selected, the user account is active immediately. -
Save your changes. You can now proceed to connecting your Identity Pool as an Identity Provider in a workspace. For details, see Creating Identity Pool IDP.
Configure Identity Schemas
-
Go to Tenant settings > Identity Pools > Schemas.
-
Select Create Schema and save your schema under a unique name.
-
Open your schema and go to the Schema tab. This is where you define the schema as a JSON object. Initially, the default schema is shown. Take note of the top-level objects:
Object Description properties An array of objects where each object represents a property to be entered by the user description Schema description for identification purposes. This description is displayed as a header on the user registration form. type Schema data type - there should be no need to change this as the schema will always be an object. required List of mandatory properties for user registration Modify the schema by adding more properties. Add mandatory properties to the
requiredlist. For example, to add ane-mailandcustomproperties, you can make the following modifications:{ "properties": { "family_name": { "description": "user last name", "type": "string", "minLength": 1 }, "given_name": { "description": "user first name", "type": "string", "minLength": 1 }, "name": { "description": "user full name", "type": "string", "minLength": 1 }, "e-mail": { "description": "user e-mail", "type": "string", "minLength": 1 }, "custom": { "description": "Custom", "type": "boolean", "minLength": 1 }, }, "description": "sample user data schema", "type": "object", "required": [ "family_name", "given_name", "name", "email" ] }As a result, the required user payload (both on administrator and user side) looks as follows: